Data Pipelines
Data Pipelines Overview
Data Pipelines makes it easy to create, manage, and deploy data integration tasks. Integrate data from any source into a staging area, where you can design processing and automation dataflows.
Key components of data pipelines
Connect to Structured and Unstructured Data – Data pipelines support both structured and unstructured data. This means you can connect them to file and blob storage sources (such as Google Drive, Dropbox, S3) and ingest various file formats like PDFs, Spreadsheets, CSVs, and more. You can also connect to SaaS platforms, SQL databases and Warehouses such as Snowflake and Databricks.
Staging Area – The staging area is a highly scalable data lake built on the Toric platform that serves as a central repository for storing all types of data. The staging area ensures efficient and secure storage of data, enabling seamless access and retrieval for processing and insights generation.
Data Processing Flows – Data processing flows can retrieve objects from the lake and process them at scale. A processing flow is executed on a scheduled, and incrementally. This means it will only execute for new data objects in the lake.
Write to – Design how processed data is mapped to a destination by using Write to Destination nodes in the processing flow. Processing flows can map data to Lakes, Warehouses, or Toric Managed Storage (Data Tables and Toric Warehouses).
Migrating from Automations? See what is different with Data Pipelines.
Although Data Pipeline shares similar features with Automation, there are some aspects that set Data Pipeline apart.
- Easy to use: Unlike Automations, connectors, storage and processing flows and destinations can all be conveniently managed in one place.
- Staging area: data ingested by data pipelines land into the staging area where they are marked for processing by processing flows that run independently.
- Better monitoring: data pipelines have a built in progress monitoring for both ingestion and processing tasks.
Get Started - Setup Data Pipeline for Data Ingestion
If you prefer to read, we have provided written instructions for your convenience.
Importing your data in Data Pipeline
To import your data in the Data Pipeline, follow these steps:
- Click the "Create" button to start creating a data pipeline.
- Choose an Import Source and click "Next".
- Configure your Connector.
- Select the data you want to import.
- Finalize the name and schedule for your pipeline.
We will provide detailed information on each step to help you better understand the specifics and nuances.
To initiate a data pipeline, click on the "Create" button located in the top left corner.

The process of building a Data Pipeline involves 4 steps:
Step 1 - Pick an Import Source
In this step, you will need to choose your import source. Please keep in mind that you can only select one source at a time. For instance, if you wish to import data from both Procore and Salesforce, you will need to set up two separate pipelines - one for each source.
Moreover, if you have already established a pipeline for a particular source, you can always locate the existing pipeline and make any necessary adjustments to it. There is no requirement to create a new pipeline for the same source. The choice is entirely up to you.
Once you have chosen your import source, simply click on the "Next" button to proceed to the next step.
If you don’t see the source you need, please let us know!

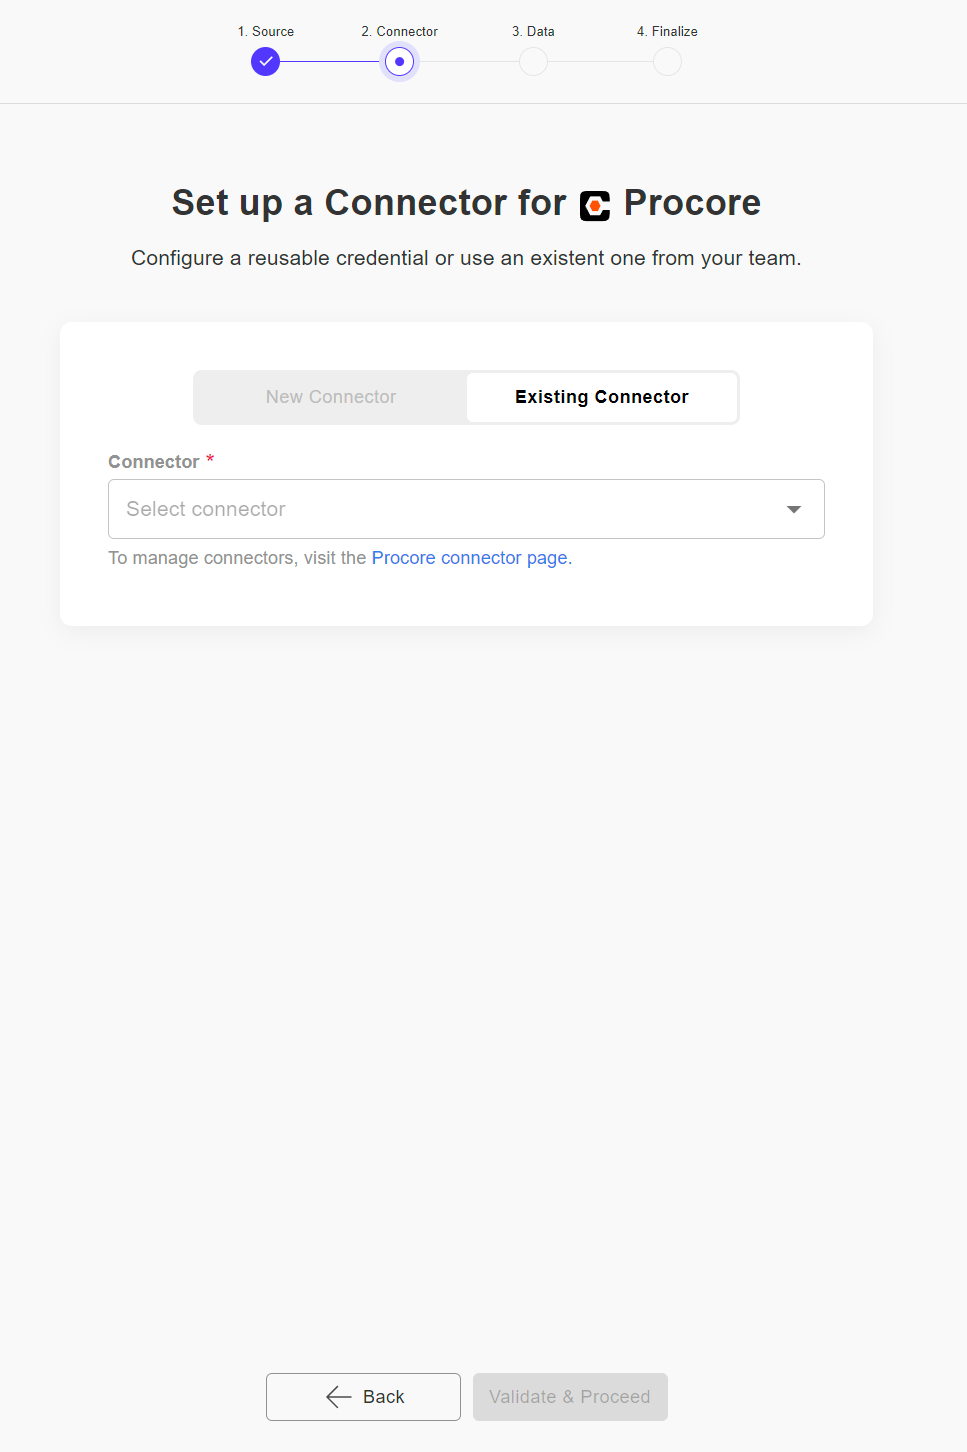
Step 2 - Set up a Connector
In this step, you will need to set up your connector.
If you need help setting up a connector, please refer to our Connector Tutorial for more information.
- If you're new to your Toric journey and haven't set up a connector yet, you can do so by going to the "New Connector" tab. We recommend clicking on "Validate Connector" to make sure your connector is working correctly.
After you've set up your connector, just click on "Create & Proceed" to move on to the next step.

- If you already have a connector, you can select it from the Existing Connector tab. Don't worry if you're unsure whether the connector will work, as we will validate it when you proceed to the next step.
Once you have set up your connector, simply click on "Validate & Proceed" to move on to the next step. If the connector is invalid, an error message will be displayed. You can modify your connector on the Procore Connector Page, which can be accessed through the provided hyperlink.
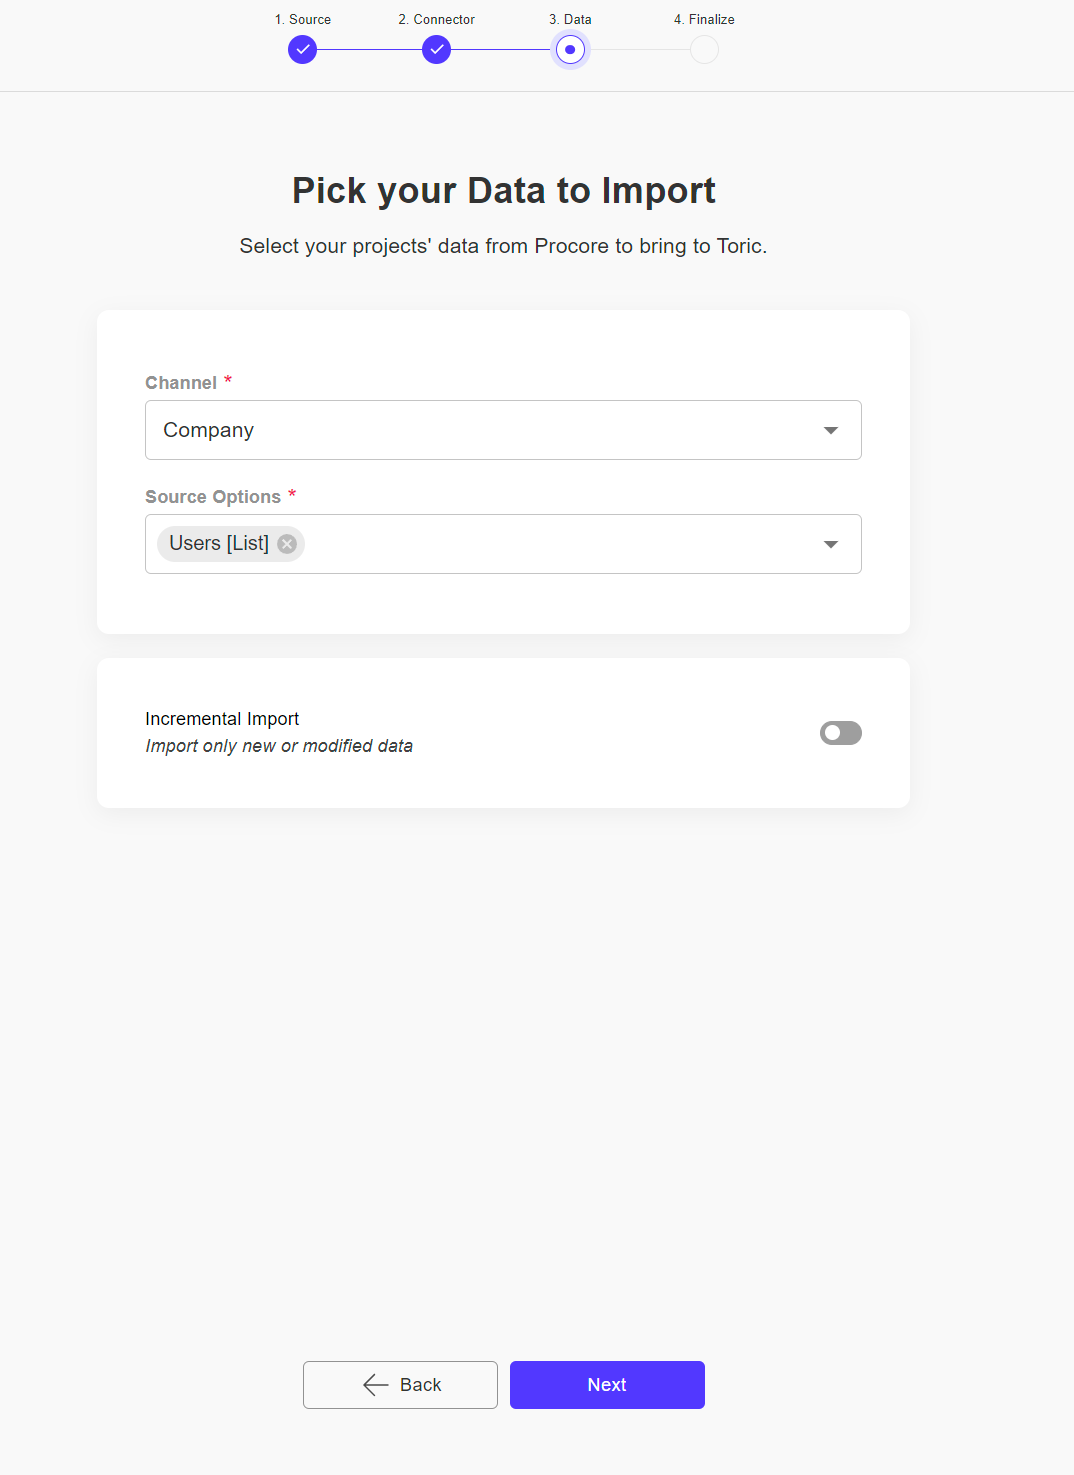
Step 3 - Select your Data to Import
In this step, you will need to select your data to import. The setup process may vary depending on the Source you have chosen. The example below illustrates selecting the Procore Users [list] endpoint, which is a Company level endpoint.
You also have the option to enable incremental import if desired. By default, this feature is disabled. Enabling incremental import allows you to extract and load new and modified data from your source to your destination. This approach is efficient as it only updates new information instead of re-importing all data.
If you would like to learn more about incremental import, please refer to the Incremental Ingestion page.
Once you have completed the data import setup, simply click on "Next" to proceed to the next step.
Step 4 - Finalize your Pipeline
In this step, you will complete the final tasks for your pipeline.
While it's not required, we suggest choosing a name that best summarizes your pipeline. By default, the pipeline runs on a schedule, which allows users to access and analyze the most recent data. If desired, you can change the frequency of the schedule or disable it. Remember, it doesn't have to be perfect from the start; you can always make edits later.
Lastly, you have the option to start the import immediately.
To finish setting up the pipeline, click on "Create & Enable".

After finish setting up your pipeline, you will land on a Data Pipeline Detailed Page
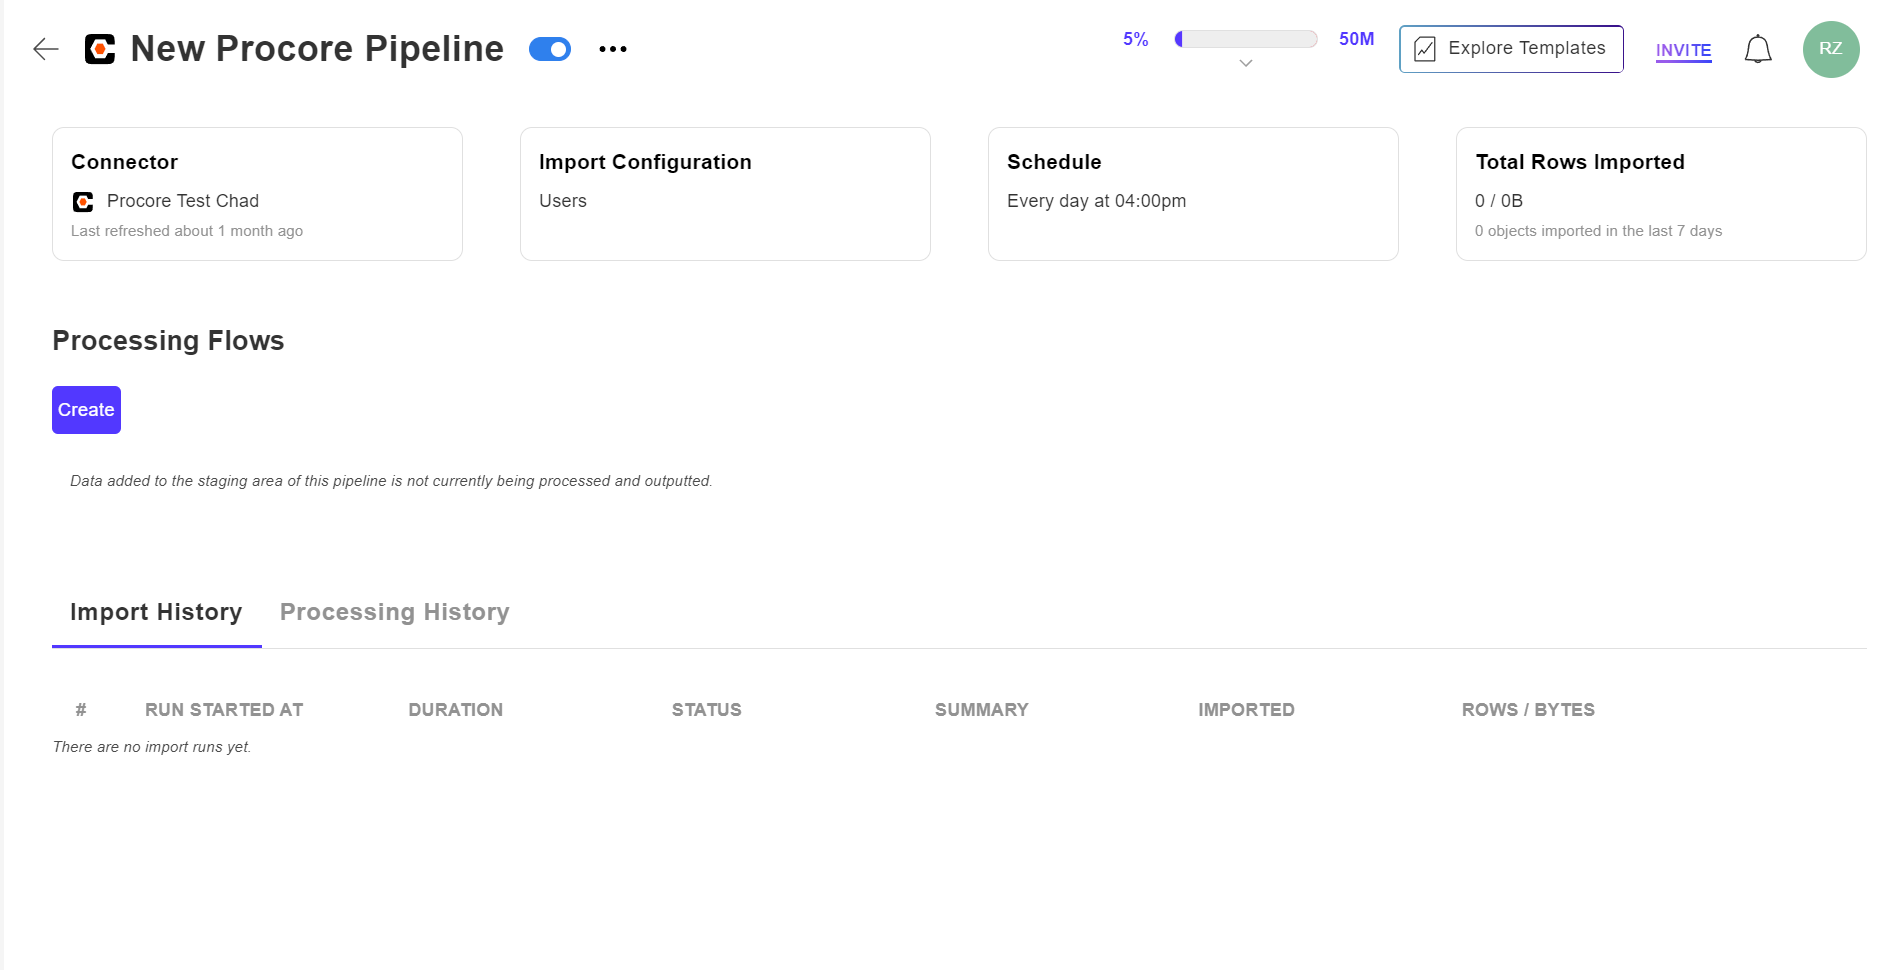
Manage the pipeline through the pipeline detail page.
In the video below, we provided an explanation of the Pipeline Interface and demonstrated how it can be used to effectively manage your pipeline.
If you prefer to read, we have provided written instructions for your convenience.
On a Pipeline Detailed Page, you can easily handle your data ingestion setup, manage your data processing workflows, and keep track of your import and processing histories.

We will start at the top of the Pipeline page and go through it step by step.

At the top of the page, you will find the pipeline name, On/off toggle for enabling pipeline, and a meatballs menu icon (three horizontal dots). Clicking on the icon will open a menu with additional options.
- The on/off toggle: Activating the toggle enables the pipeline. When the toggle is deactivated, data ingestion will be disabled.
- Run Once: By clicking on "Run Once," you can start a one-time data import.
- Cancel Import Run: If an import operation is currently in progress, you can choose to cancel it.

You will have the capability to effectively manage and control the process of ingesting your data here.
- Connector: Select the Connector card to make changes to your current connector.
- Import Configuration: Select the Import Configuration card to make changes to your data/endpoint selection.
- Schedule: Select the Schedule card to make changes to your data ingestion schedule.
- Total Rows Imported: This provides a summary of the current data consumption for this pipeline. Clicking on this card will take you to the staging area.
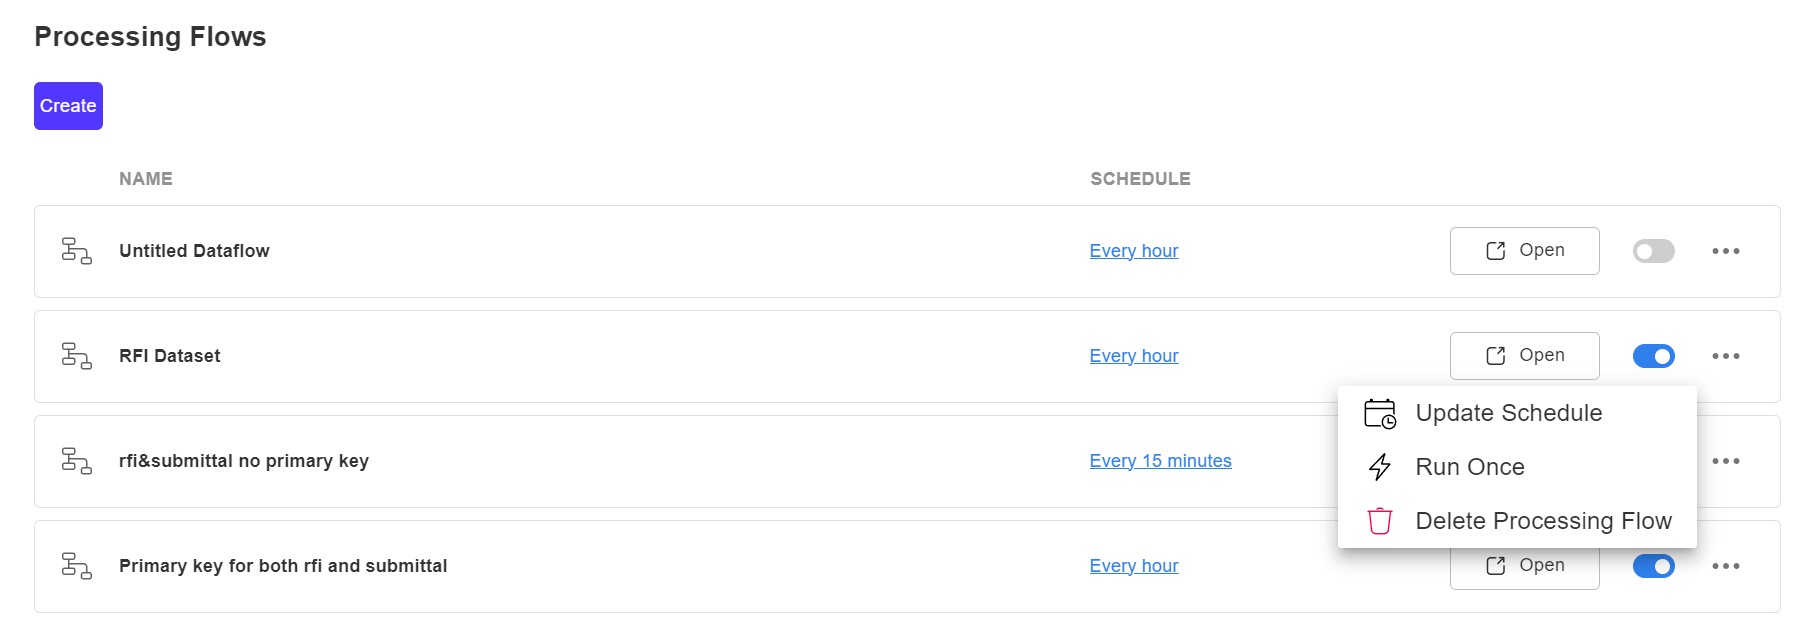
In Processing Flows section, you will be able to manage your data processing flows. Each dataflow has a meatballs menu icon (three horizontal dots) for additional options.
- Create: This option enables you to create a new data flow for processing your data.
- Schedule column: By clicking on the schedule for each individual flow, you can make changes to the data processing schedule.
- Open: Clicking on the Open button takes you to the dataflow page where you can review and make changes to the dataflow.
- Update Schedule: By clicking on the schedule, you can make changes to the data processing schedule.
- Run Once: By clicking on "Run Once," you can start a one-time data process.
Tips for managing your schedule: The time it takes to import your data may vary depending on its size. However, you don't have to wait for the import to complete before you start working with your data. To speed up the data processing, you can configure set shorter intervals for processing tasks. By doing this, you can start processing the data without waiting for the ingestion to finish. The ingested data will be processed concurrently with the data ingestion.
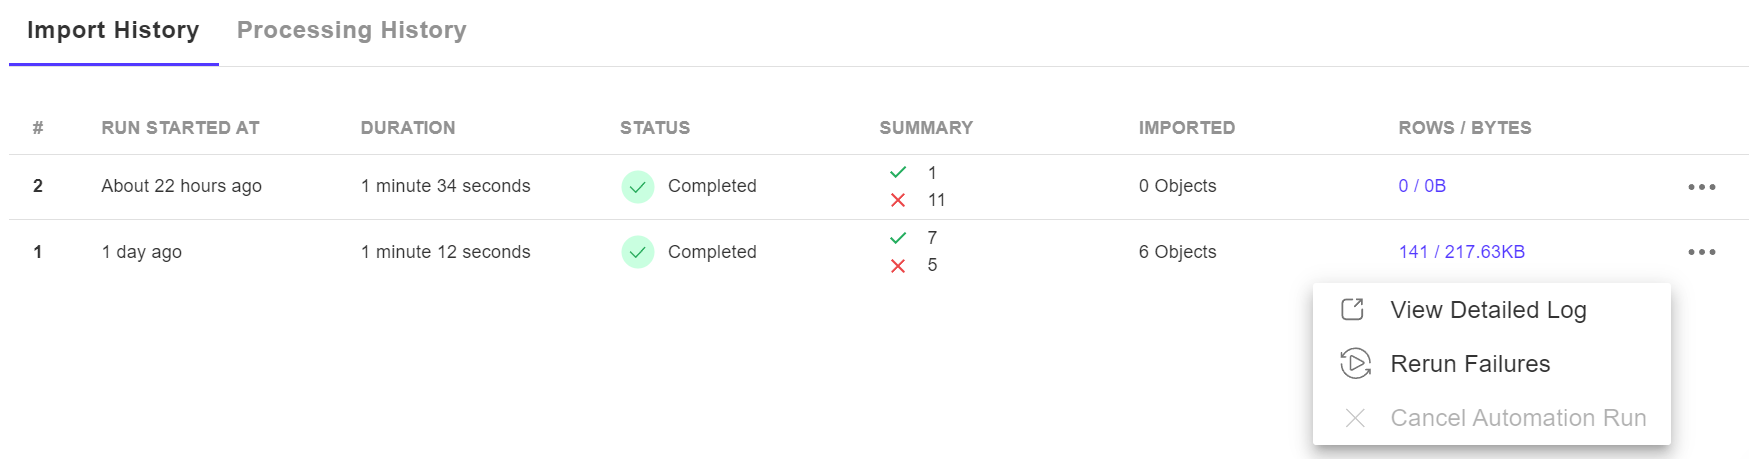
In the History Summary section, you can keep track of your import and processing histories. Each history is equip with a menu icon (three horizontal dots) that provides additional options.
- Status: This indicates the status of your data import/processing activities, which can be "Completed," "In processing," or "Cancelled." Please note that a completed status does not necessarily indicate a successful activity.
- Summary: This displays the success and failures of each task. A green checkmark signifies success, while a red cross mark indicates failures.
- Rows/Bytes: This shows the amount of data consumed by each import.
- View Detailed Log: By clicking on "View Detailed Log," you will be redirected to a separate page where you can view the detailed automation log.
- Rerun Failures: If there are failures in your data import, you have the option to rerun only the failed tasks. We recommend using the detailed log to identify the cause of the failure and address it before selecting "Rerun Failures."
Processing your data in Data Pipeline
Staging Area
The Staging Area is the place where data “lands” after it’s ingested. Once data lands in the Staging Area, it stays there and is ready for being processed. You can use the Staging Area Browser to inspect when and what data has been ingested by the pipeline. Staging Area Browser can be accessed thru the “Total Row Imported” card on the top left.
Data in the staging area is marked with details like the import date, dataset, and import run number. These marked data can be processed using any processing flow created in the pipeline. You have the option to use a query condition in the processing flow to select specific data for processing. Once the data is processed, it will be marked with information about the processing flow, processing run number, and process status.
Setting up a Processing Flow
In the video below, we explained how to set up a processing flow.
If you prefer to read, we have provided written instructions for your convenience.
There’re two ways to create a Processing Flow. You can use the “Create” button when you’re in Pipeline Detailed Page, or use the “Create Processing Flow” button when you’re in Staging Area.
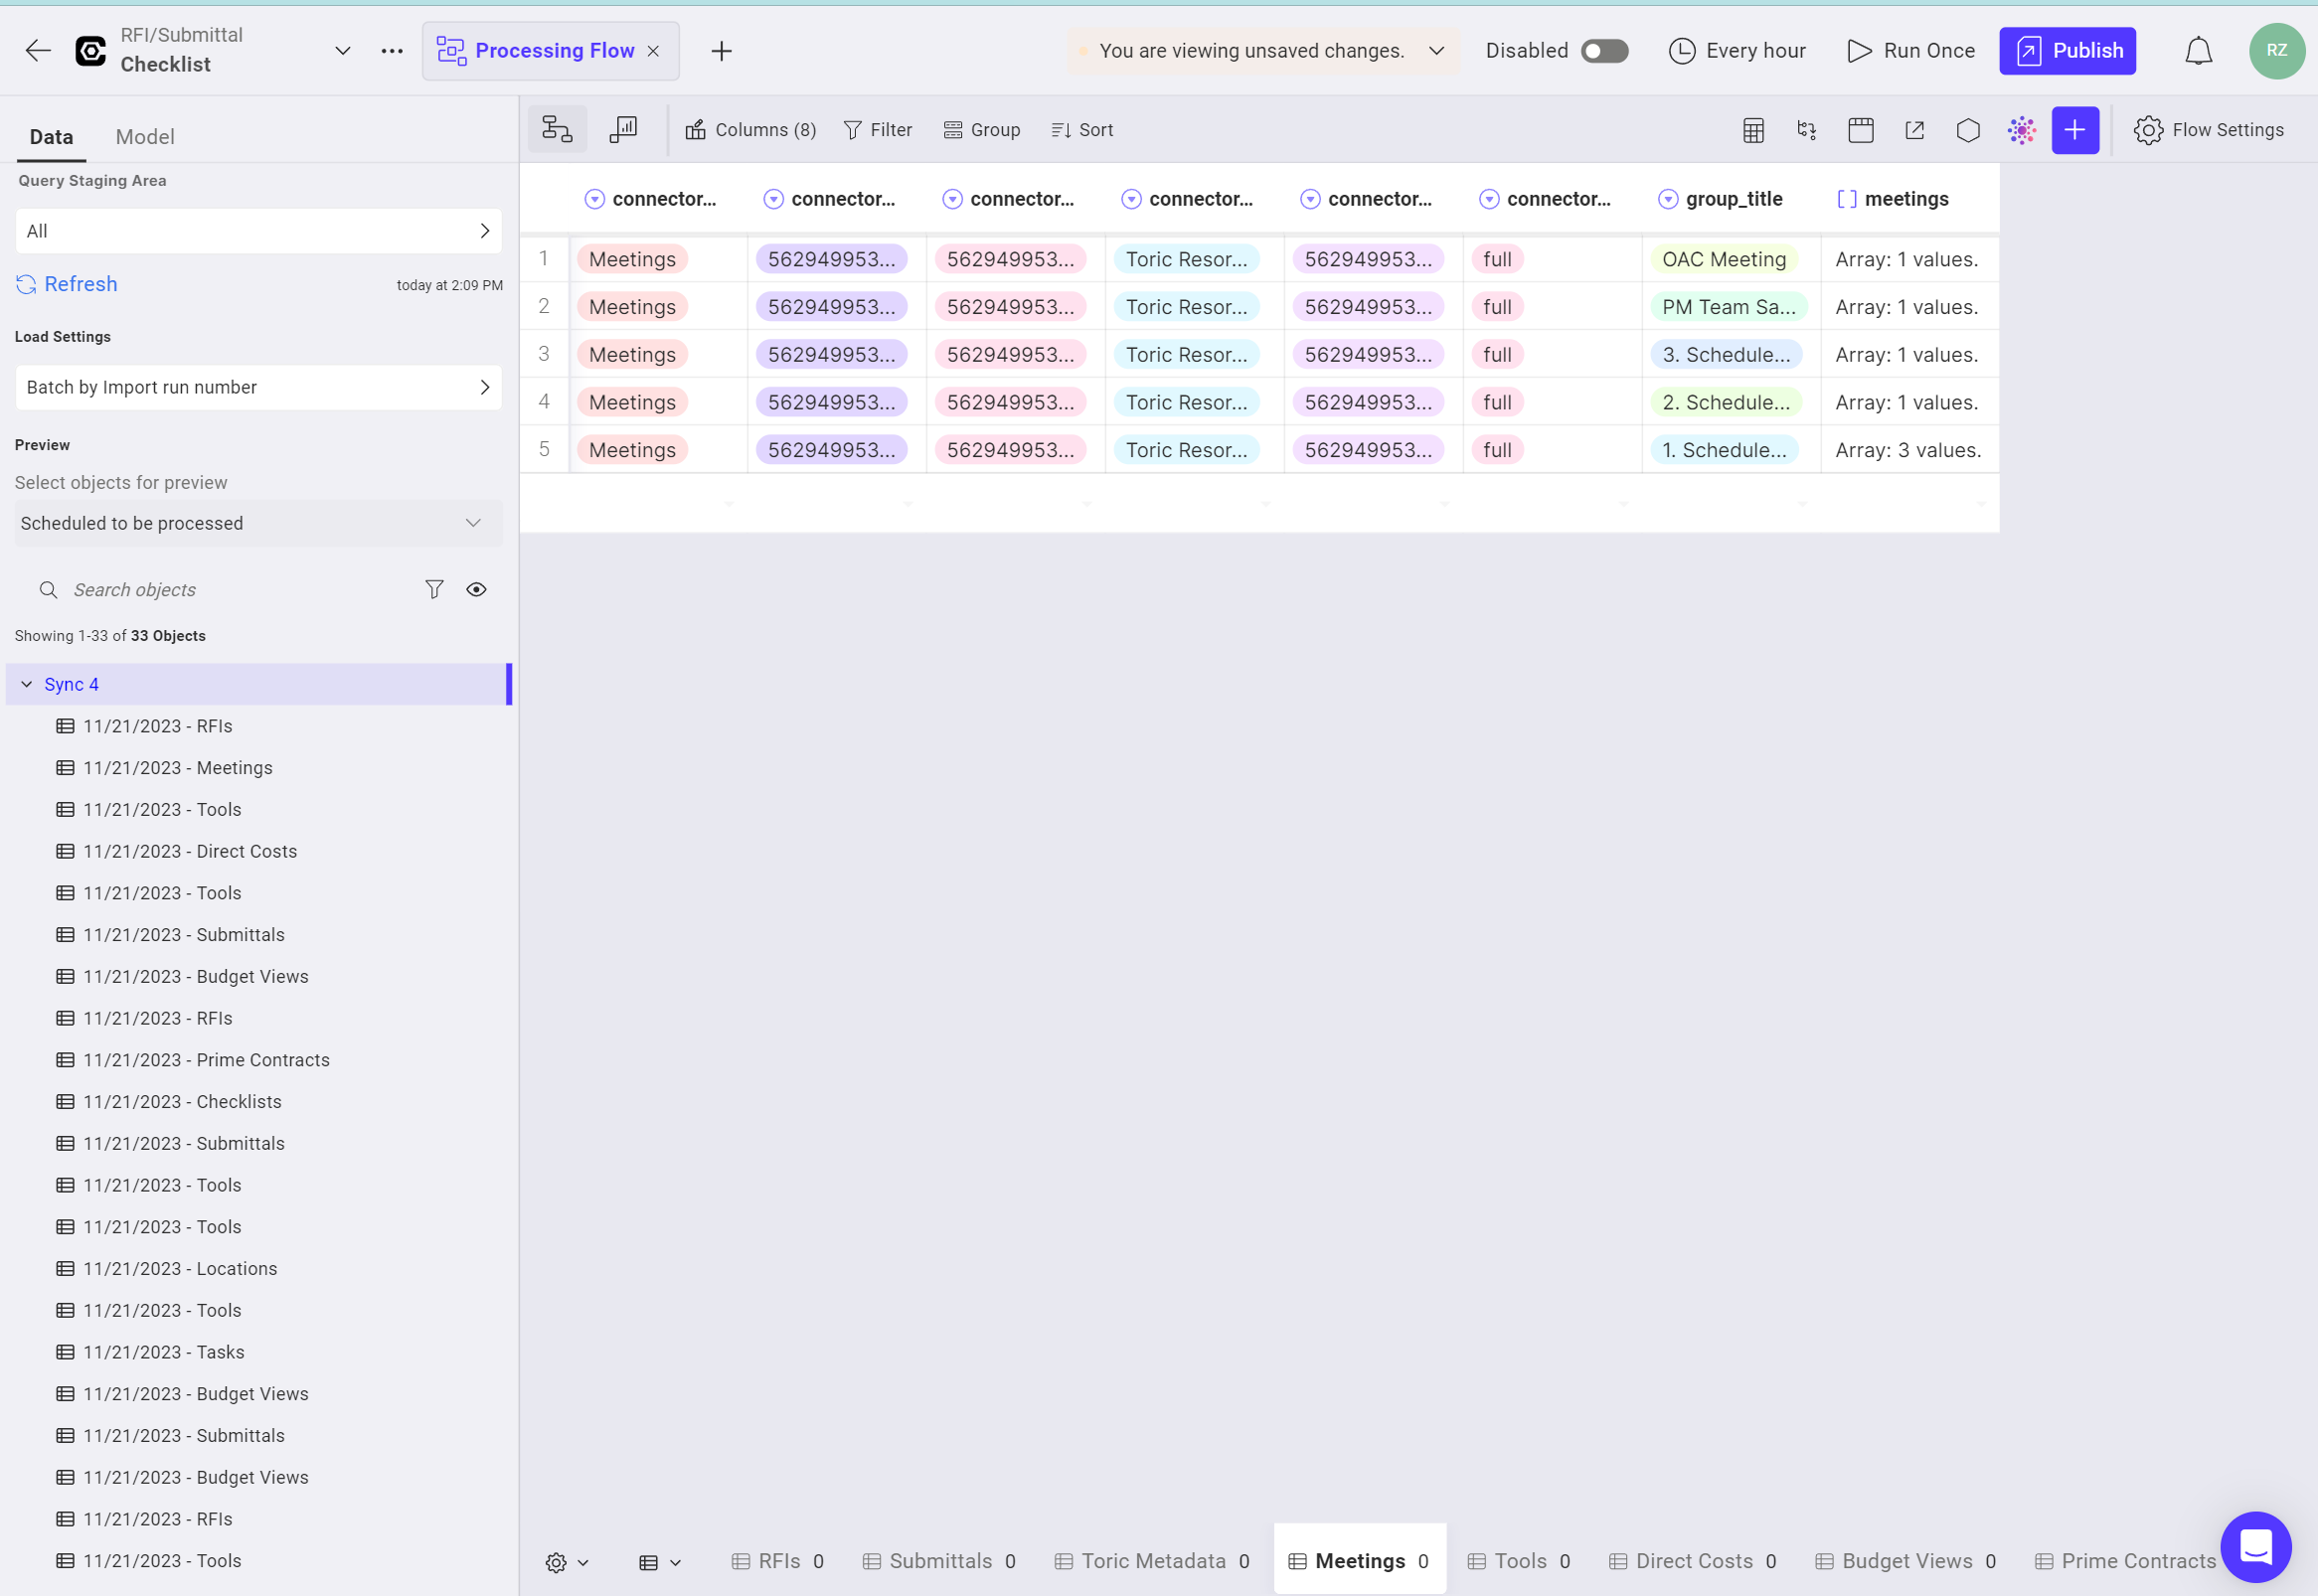
Above is a screenshot of a standard Processing Flow layout. While there are a few incomplete settings, it serves as a useful example to demonstrate the setup process for a Processing Flow.
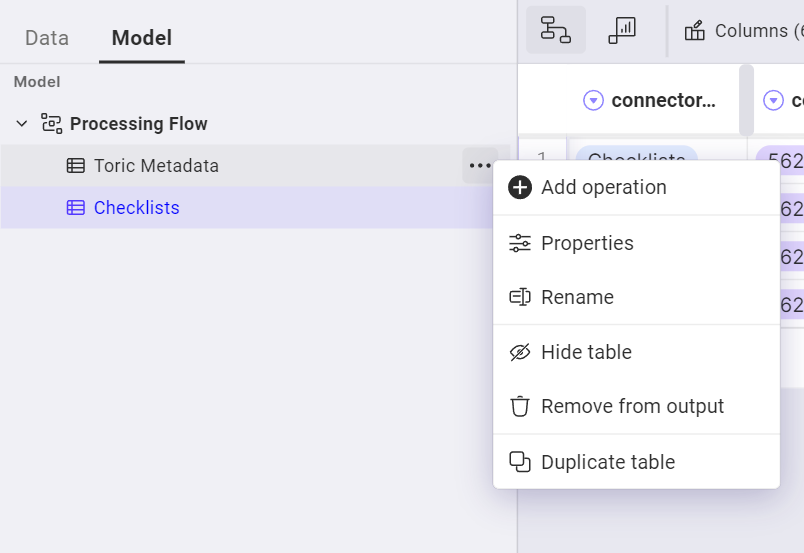
All the operations you perform on your data will show under the Model tab.
You can also add operation to your data thru the menu icon (three horizontal dots).
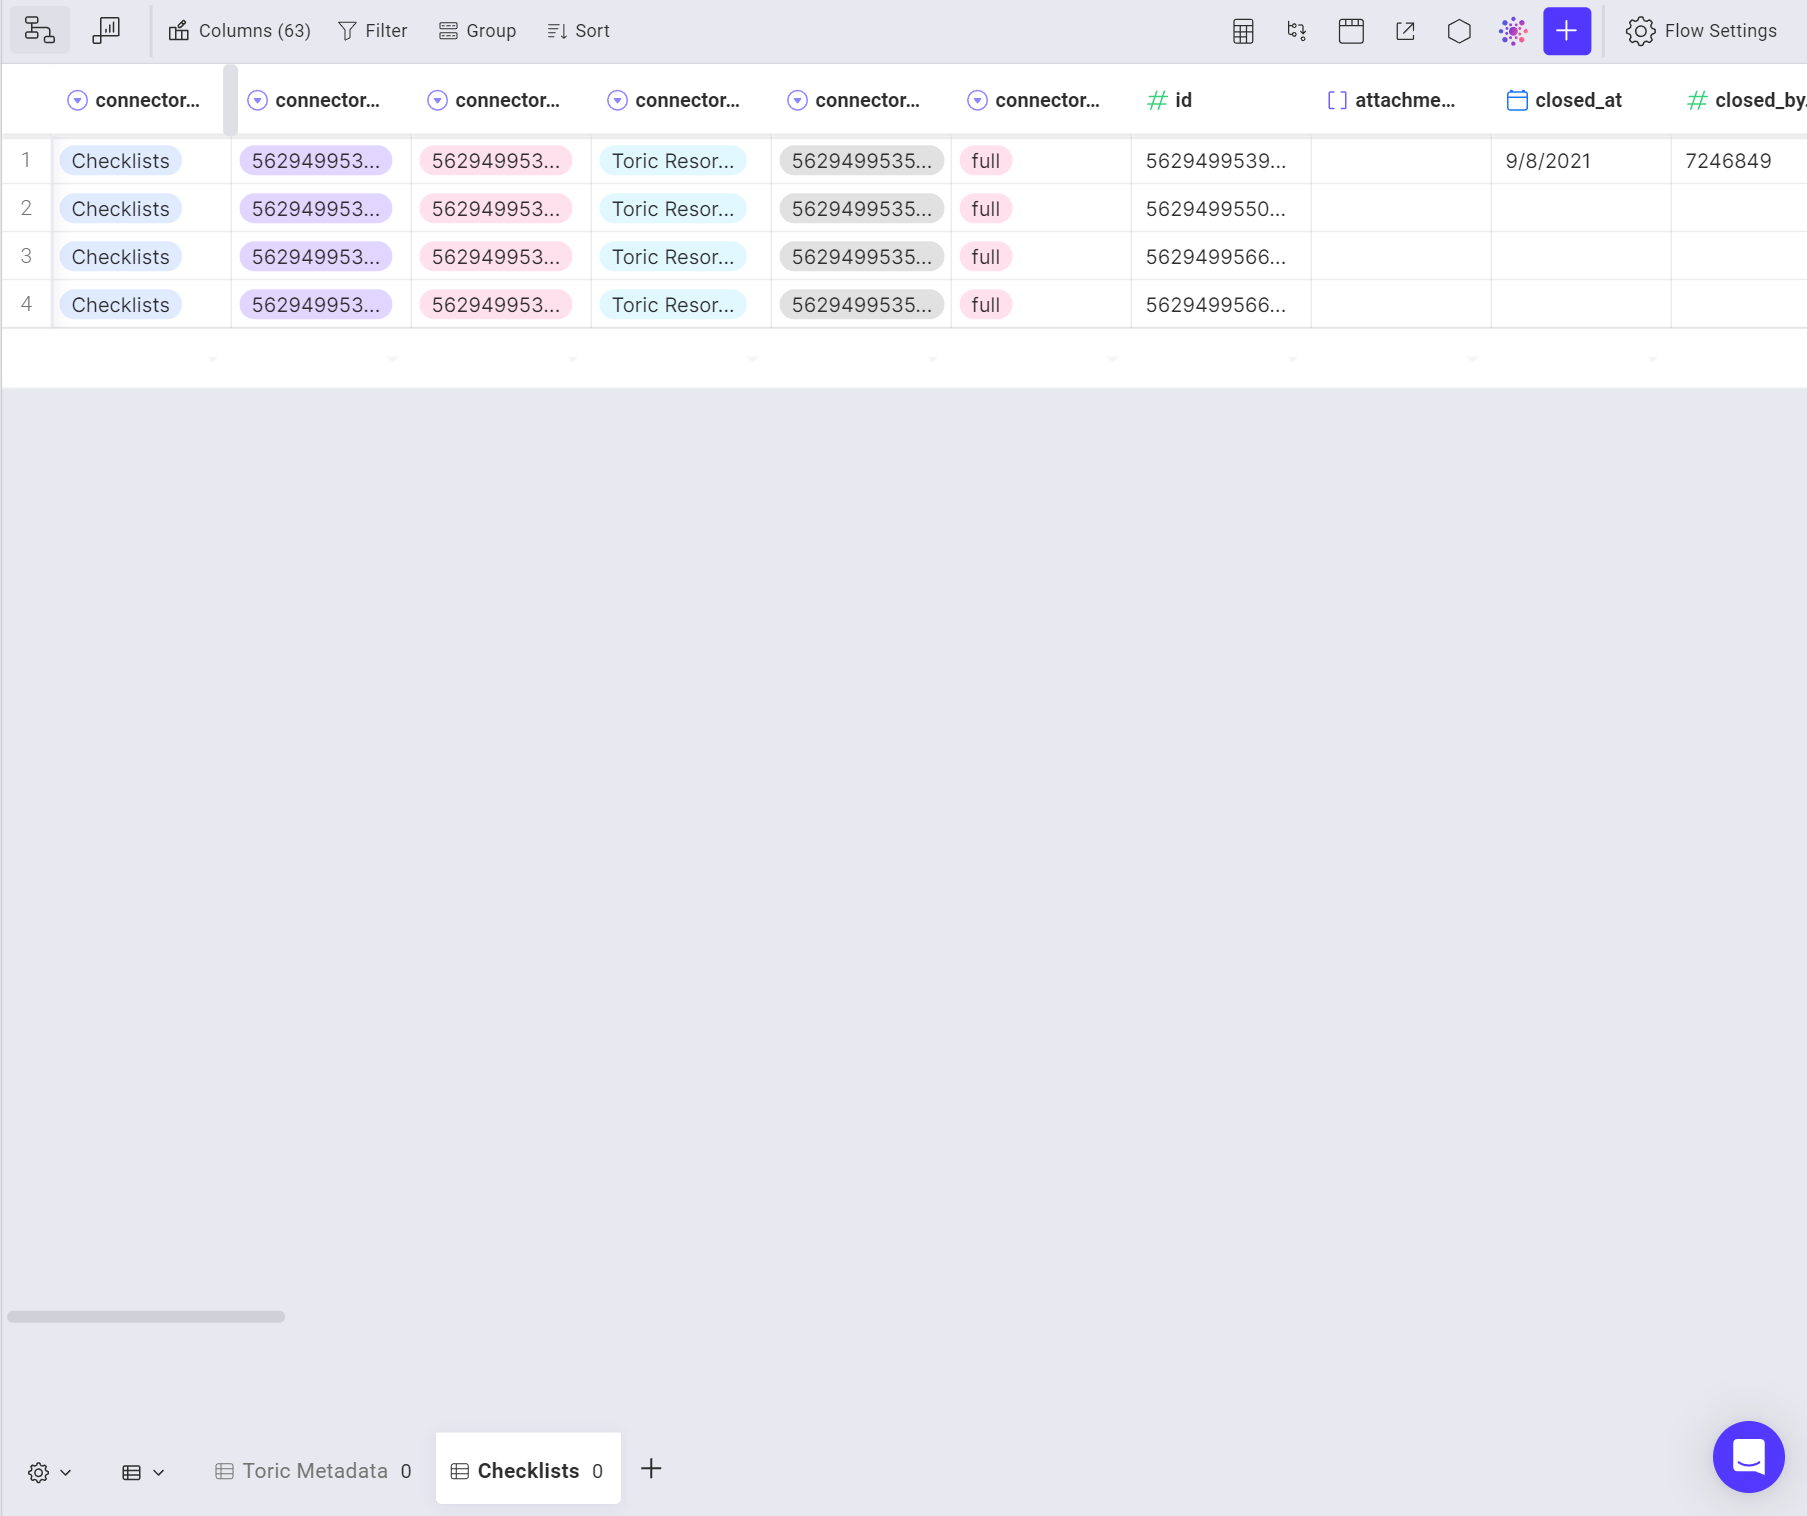
This section allows you to review your data. The way you set up your data on the left panel directly affects what you will see here.

Your processing flow can have one of three statuses: unsaved draft, unpublished draft, or published. By using different background colors, you can easily identify the status of your processing flow. Orange indicates unsaved draft, grey indicates unpublished draft and green indicates published.
Save → saving your flow stores your changes as you work
Publish → Publishing your changes promotes them to the "production" level. When the processing automation runs, it always uses the latest published version.
Therefore, it is essential to publish any changes made to your processing flow. If your latest change is saved but not published, the processing flow will not run based on the saved version, but instead on the last published version.


