Primavera P6 EPPM
Primavera P6 EPPM offers a range of project management features, including scheduling, resource management, cost control, risk management, and collaboration tools. It allows users to create and track project schedules, assign tasks and resources, monitor progress, and generate reports.
Access and ingest Activity and Relationships data from P6 EPPM into Toric for no-code data integration, engineering, and visualization. Use Automations to update data daily to and ensure stakeholders are seeing the most recent information.
With the P6 EPPM connector, users can:
- Ingest Activity and Relationships data into Toric for no-code transformation
- Blend P6 data with other sources to create meaningful insights
- Create interactive scheduling dashboards and scorecards to track project progress
- Share visualizations with project stakeholders, or embed analytics back into a 3rd party tool like Notion or Sharepoint
- Gain real-time insights, avoid scheduling issues, and improve efficiency to keep projects on track
Configuration guide
Setup Time: 1-2 minutes
Requirements:
- Active P6 EPPM
- Set permissions for your P6 account in order for Toric to access your data
- Configuration details
- P6 EPPM username
- P6 EPPM password
- Server URL
- Database
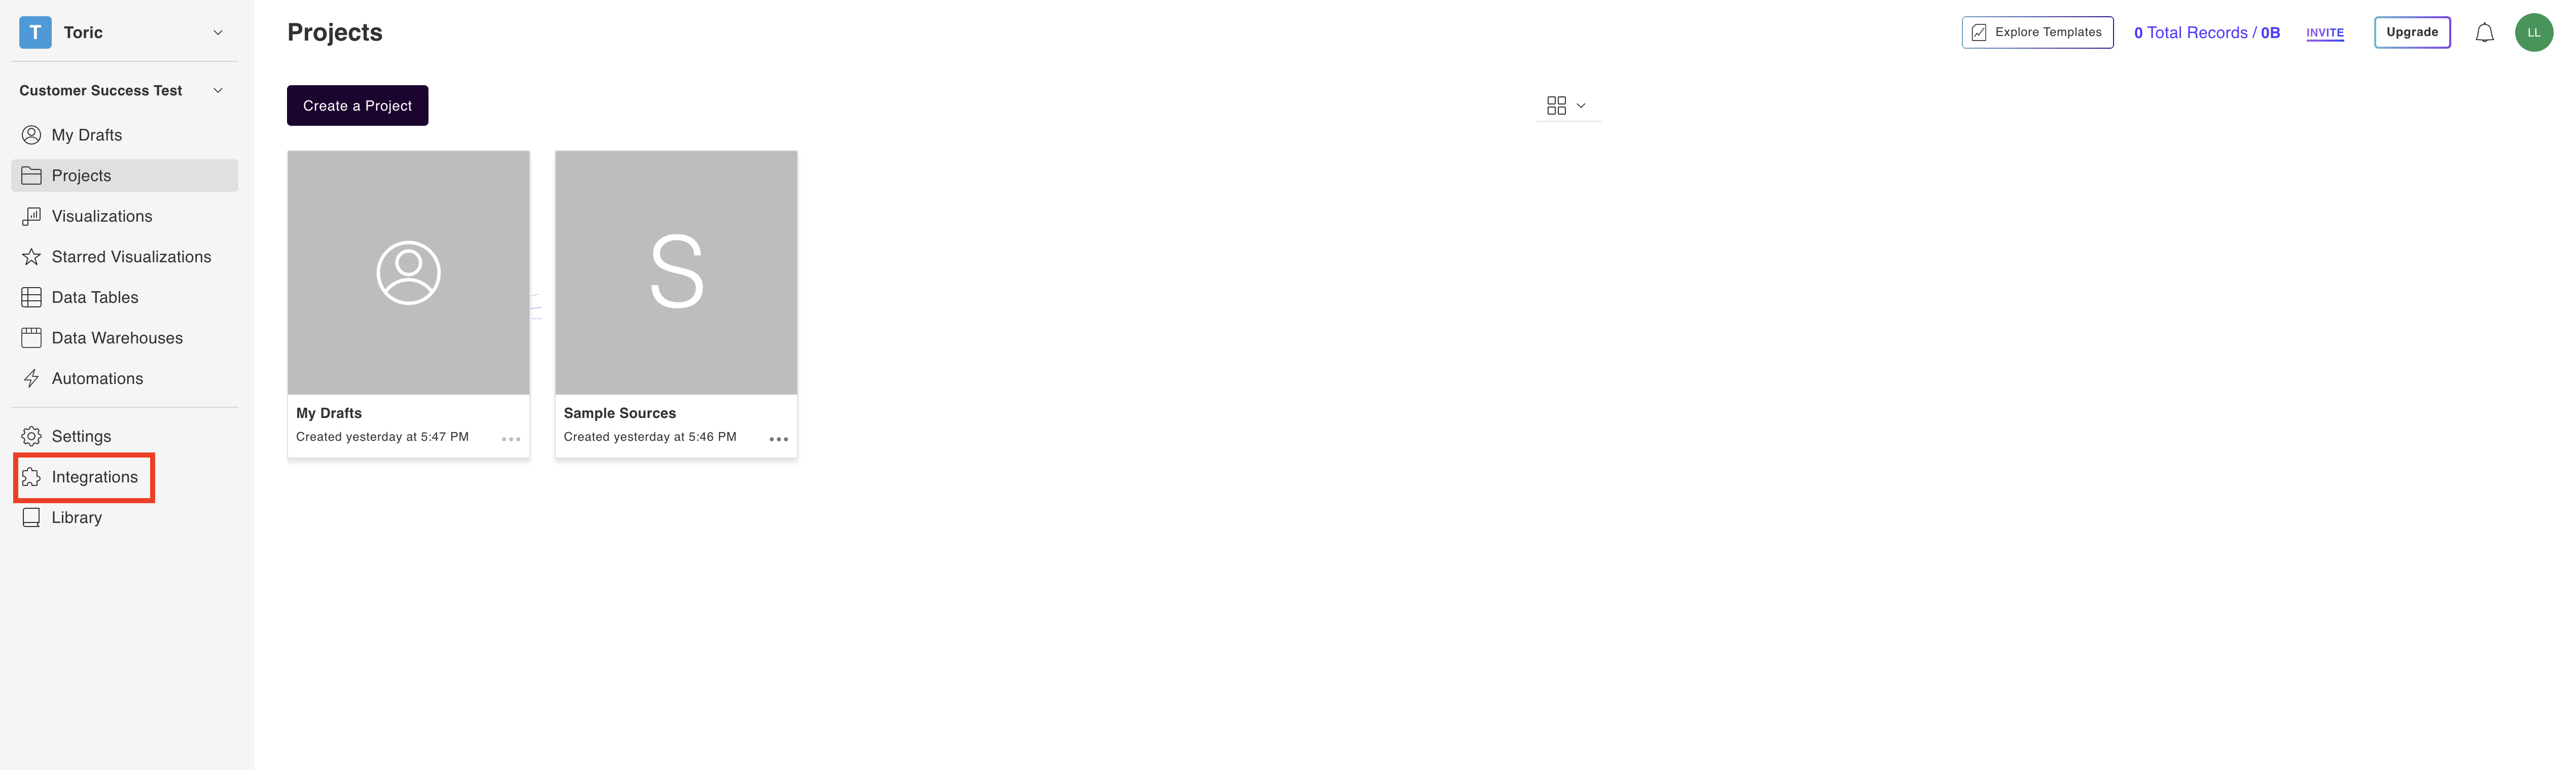
1. Navigate to the Connectors
To find connectors in Toric, you must be signed in to your account. On the left side panel of your Workflow, click on "Integrations".
2. Select the P6 EPPM Connector
Under ‘Construction & BIM’ header, find the “Primavera P6 EPPM” connector and click on “Setup Integration”

3. Click on Create a Connection

You should be prompted with a Create Configuration window.


4. Fill in your P6 EPPM credentials and database
Note: This is the same information used to configure the connectors. Please ensure that you have the correct permissions set up for your P6 account.
Fill in your Configuration details.
- Configuration name
- Assigning a configuration name is important. When choosing a name, keep in mind you want the name to to be properly descriptive.
For example:
“P6-EPPM-production-west”
- P6 EPPM username
- P6 EPPM password
- Server URL
- Finding your Server URL for P6 EPPM Cloud.
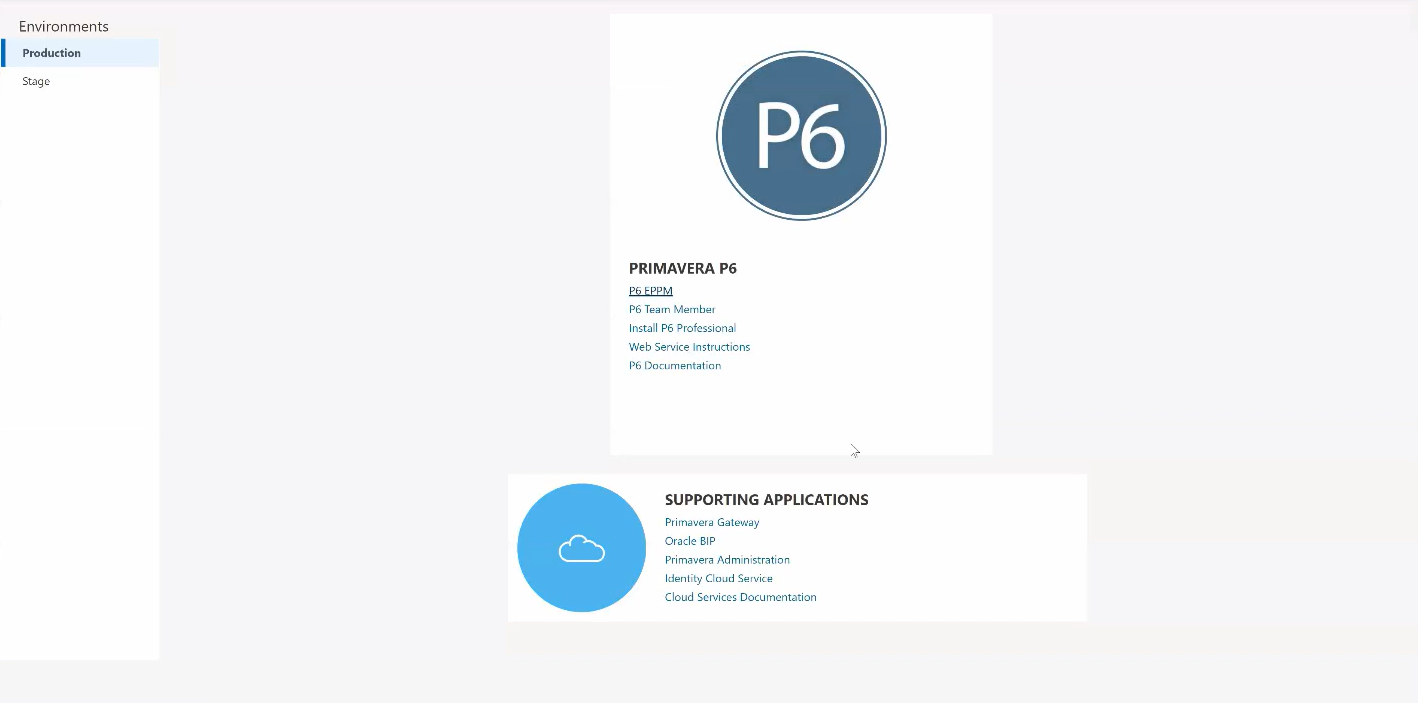

- Login to your Oracle Primavera Portal and click on Web Service Instructions.
- Copy the P6 EPPM Web Service URL of your organization. It should look like the following:
us2.p6.oraclecloud.com/{company}/{environment}/p6where{company}is your org name.
- Database
- Your Database name is the database you want to connect to in P6 EPPM. This field is case sensitive. Input the name exactly as listed within P6 EPPM.
5. Click on Validate Configuration
Now that you have all Configuration details filled in, click Validate Configuration.

If the information entered is valid, a Validation Successful message will appear.
Invalid fields will be highlighted in red.

6. Click “Add Configuration” to finalize your configuration

Behind the Firewall Access
When setting up a behind-the-firewall access for your P6 EPPM connector in Toric, there are several key considerations to keep in mind. By paying attention to these aspects, a smooth and secure connection between your infrastructure and Toric's services can be established. Here are the important factors to consider:
- Allow Toric IPs to access to the infrastructure
To establish communication between Toric and your network, you need to whitelist or configure your firewall to allow access from Toric's IP addresses. Toric provides a list of these IPs, which you can find in the Toric's IPs documentation.
- Set upport forwarding correctly
Port forwarding is essential to ensure that incoming requests can reach your P6 EPPM connector behind the firewall. By configuring port forwarding appropriately, you establish the necessary routing for effective communication.
- When applicable, have the proper Secure Socket Layer (SSL) certificates
- Ensure the SSL certificate matches the domain name used to connect to the machine
- Ensure the SSL certificate is not self-signed
- Where applicable support monitoring and autoscaling
Write To P6 EPPM
Toric provides the ability to Write To P6 EPPM. We have started off with writing back activity status to P6 EPPM.
Step-by-Step:
- Have a P6 EPPM connector configuration ready by following the steps in the Configuration Guide above.
- Add the Write to Destination node to the dataflow.
- Connector: Select the connector configuration you created above
- Action:
- Create: Create new records in P6 EPPM for the specific project
- Update: Update existing RFIs in P6 EPPM for the specific project
- Map all the required columns in your Activity Status data to the expected columns in P6 EPPM for activity statuses.
- [For Create] Retrieve the ProjectObjectID & WBSObjectId map to the first and second column respectively.
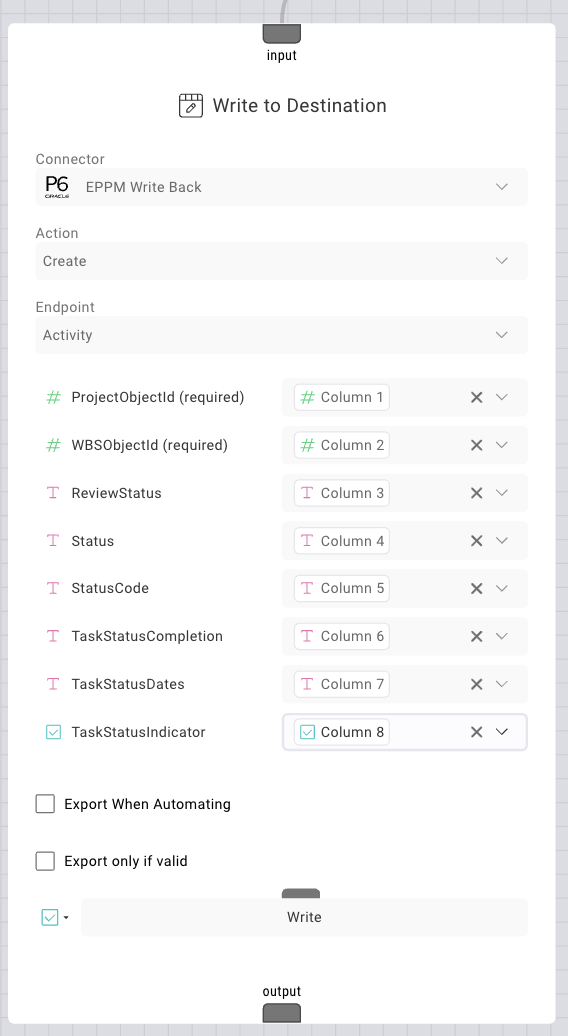
- [For Update] Retrieve the ObjectID and map to the first column

- Export when Automating [checkbox]: Check this box if you want to Write to P6 EPPM while running a “Run Dataflow” automation.
- Export only if valid [checkbox]: Check if you want to export only if the rest of the Write to Destination node configuration is valid.
- Click Write, only if you are manually writing to P6 EPPM and not if this is an automated dataflow.
- Check P6 EPPM to see if activity statuses have been updated or created.
Integration Capabilities Supported by the Connectors
Toric ingests data from P6 EPPM via APIs. We currently support data access to 25+ endpoints from Activity and Relationships. Please reference the Data Access table below for a detailed list.
Data Access
| Channels | Incremental Ingestion | Read | Write |
|---|---|---|---|
| Activity Code | Available | Available | |
| Activity Code Assignment | Available | Available | |
| Activity Code Type | Available | Available | |
| Activity Expense | Available | Available | |
| Activity Step | Available | Available | |
| Activity Status | Available (create & update) | ||
| Baseline Project | Available | ||
| Baseline Type | Available | ||
| EPS | Available | Available | |
| Global Preferences | Available | ||
| Global Profile | Available | ||
| Location | Available | ||
| Project | Available | Available | |
| Project Code | Available | Available | |
| Project Code Assignment | Available | Available | |
| Project Code Type | Available | Available | |
| Relationship | Available | ||
| Resource | Available | ||
| Resource Assignment | Available | Available | |
| Resource Code | Available | ||
| Resource Code Assignment | Available | ||
| Resource Code Type | Available | ||
| Resource Rate | Available | ||
| Role | Available | ||
| Role Rate | Available | ||
| Schedule Options | Available | ||
| Update Baseline Option | Available | ||
| User | Available | ||
| WBS | Available | Available | |
| WBS Milestone | Available |
Don't see the endpoints you are looking for? Request an endpoint here!
P6 EPPM Channels
In Toric, users of P6 EPPM have the ability to access data through different channels. Channels serve as a means to access various entities available in P6 EPPM. The following are the channels available in Toric:
- Activity
- EPS
- Project
- Resource Assignment
- udfCode
- udfType
- udfValue
- WBS
- Activity

This channel provides access to activities in EPPM and each record in this channel corresponds to an Activity ID.
To set up the Activity channel, you must select the desired fields (columns) from the available data that the user wants to have access to.
The next step is to choose one or multiple EPS options. This is important, as it determines the list of projects available in the corresponding drop-down menu.
Additionally, the user can optionally filter the configured data by Absolute or Relative dates.
- EPS

The EPS channel enables users to access data associated with EPS IDs. When selecting this channel, the user will receive data related to all available EPS records, subject to any specified date constraints.
Similar to the Activity channel, the table's structure can be defined by selecting the desired list of Fields.
- Project

The Project channel can be configured in a similar way to other channels. To do this, select a list of desired fields from the available options within this channel.
The list of Projects that the user will see will depend on the EPS options selected in the dropdown menu.
Optionally, a date range can be included.
- ResourceAssignment
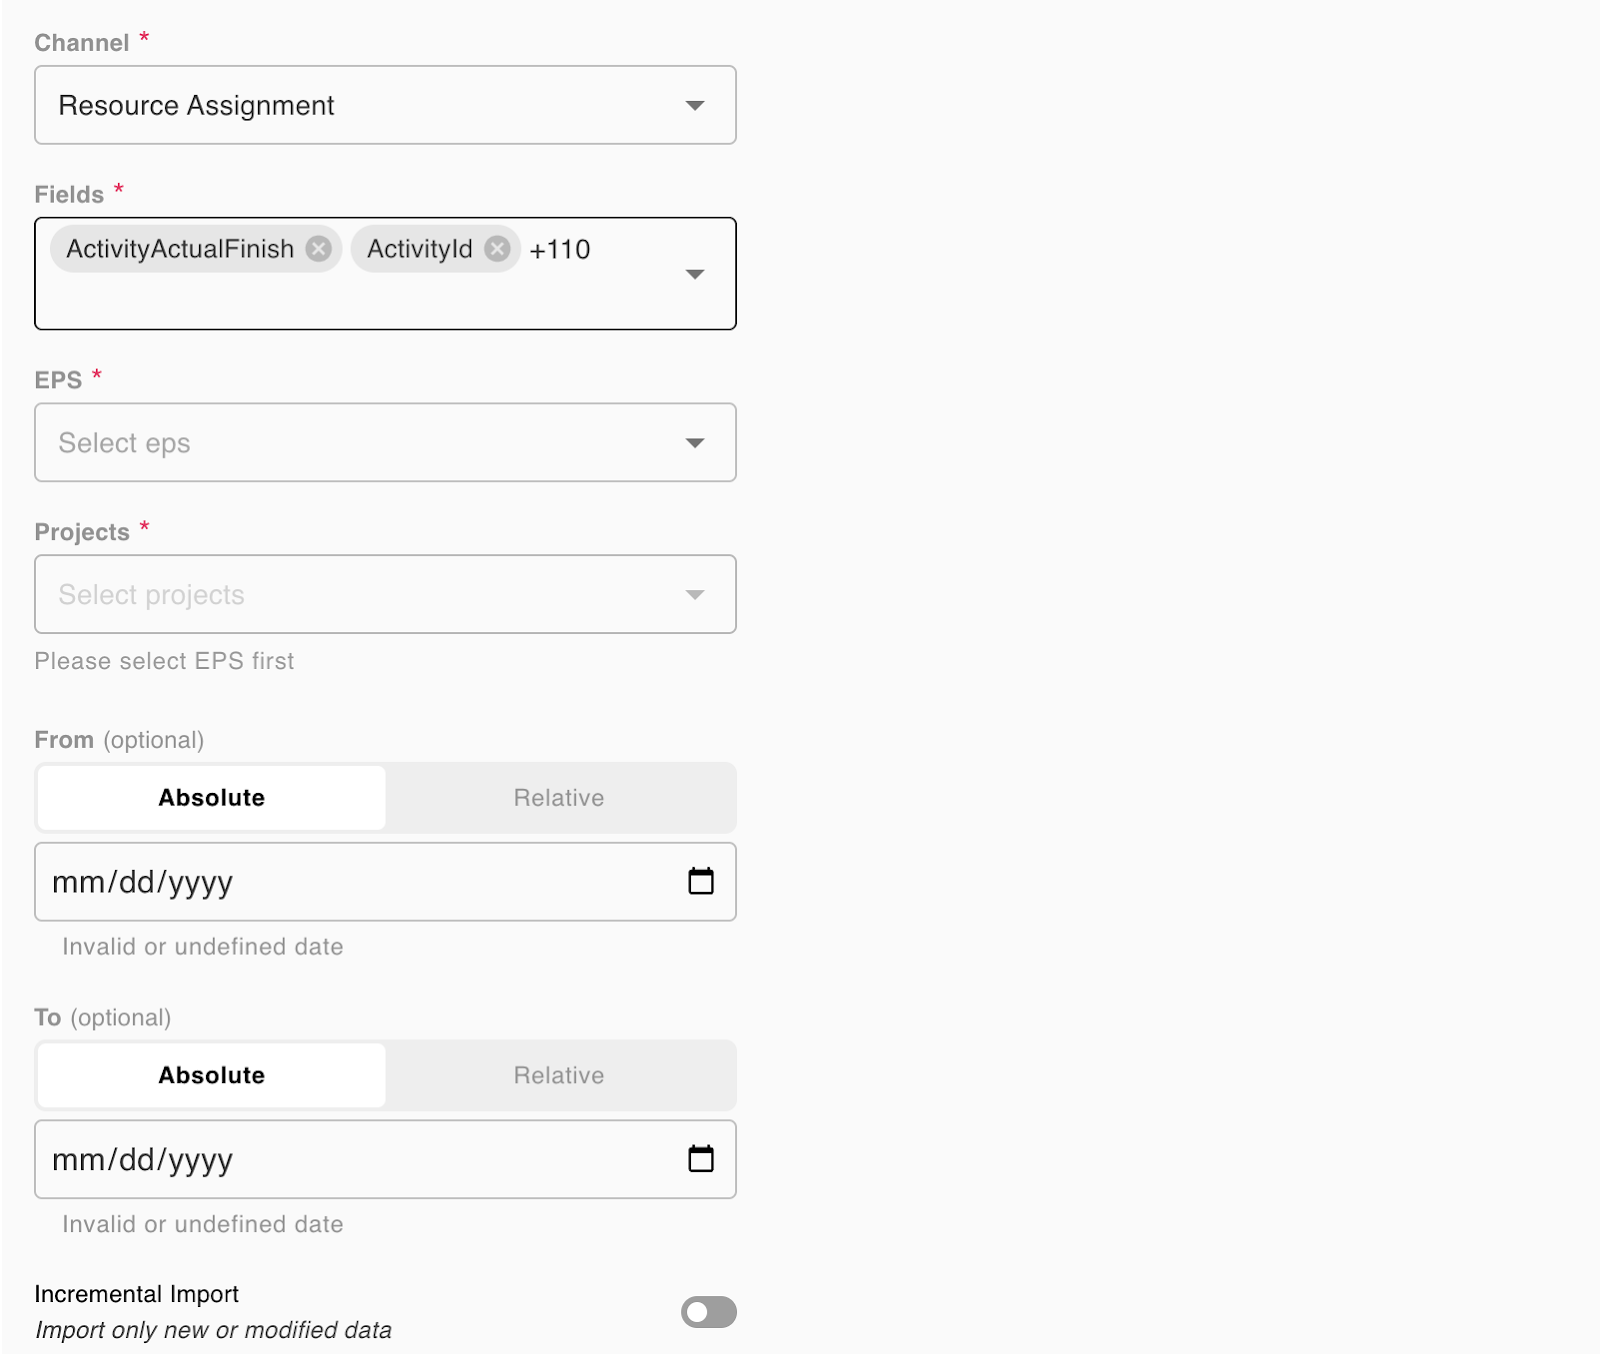
This channel provides access to different Resource Assignments for various Activities.
In terms of configuration, similar to the others, users can select fields to determine the structure of the dataset.
Similar to the Activity channel, users need to select EPS options, which will give them access to a dropdown list of Projects. The available data will depend on these selections, meaning that the Resource Assignments will correspond to the selected Projects.
- WBS

This channel allows access to WBS data in P6 EPPM. Each individual record corresponds to a unique GUID.
Similar to other channels, you can filter the ingested data by selecting an EPS. This will provide a list of projects associated with it.
- UDFs
This provides the user with access to the User Defined Values in P6 EPPM.
Related articles
https://www.toric.com/blog/using-primavera-p6-data-for-scheduling-analysis
Questions?
We're very happy to help answer any questions you may have. Contact support here or send us an email at support@toric.com.


