Data Pipelines Step-by-Step
Training Description
Data Pipelines 101 is a comprehensive training program designed to provide participants with the essential knowledge and skills to excel in Data Pipelines using Toric. Whether you're a beginner starting your data engineering journey or an experienced professional looking to expand your expertise, this training will equip you with the foundational concepts and practical techniques needed to build robust data pipelines and drive efficient data analytics workflows in Toric.
Throughout the training, you will explore various key topics, including data ingestion techniques, setting up automations in Toric, leveraging timers, performing Full Table Backups using Azure services, automating dataflows, handling deltas in data pipelines, and implementing best practices for performance optimization.
By the end of this training, you will:
- Understand the role of data engineering in the analytics workflow in Toric
- Gain proficiency in data ingestion techniques and pipeline development
- Be familiar with automations and scheduling mechanisms
- Learn how to perform full table backups
- Acquire the skills to automate dataflows and handle deltas efficiently in Toric
Duration
60 minutes
Target Audience
- Data analysts, engineers, and business intelligence professionals using Toric for Data Pipelines
- IT professionals involved in data management and processing
- Anyone interested in learning Toric for Data Pipelines
Training
Data Pipelines 101 - Creating a Data Pipeline from Start to Finish
Install Toric in Procore and Setup DMSA Account
Connecting Toric to your Procore account is simple. We’ve already written full tutorials on how to get started. Just follow the steps outlined in the articles linked below:
Setting up Your Project
Next, we need to create a Project inside of Toric. This is where we’ll import data into, as well as create a dataflow to clean and export the data.
Follow the steps outlined to create your Project.
- Click on Projects on the left-hand menu in Toric.
- Click “Create a Project”.
- Give it a name. I suggest using a naming convention, such as “FTB - RFI” where “FTB” stands for “Full Table Backup” and “RFI” is the name of the Procore endpoint we will be importing.
- Click “Create”.
Setting up Automations
Now it’s time to set up your data import automation. You will need this in order to import all of your data from your software (like Procore) into Toric. Like the rest of this tutorial, we’ll be using Procore for our examples. But this tutorial can be applied to other data sources as well, such as ACC and Revit.
First, give your automation a name and description. I like to use a naming scheme for all the import automations I created, such as “FTB - [Name of Endpoint] [Project or Company].” I know that “FTB” stands for “Full Table Backup”, so I know that any import automation that starts with FTB will be related to a full table backup of the endpoint. Let’s use the RFI endpoint for our example. RFI is also a Procore Project-level endpoint, not a Company-level endpoint, so I will name my automation “FTB - RFI [Project]”.
Now we need to set up a trigger for the automation. There are 4 different triggers:
- Time based
- Manual
- Webhook
- Source Updated
Let’s set up a Time-Based Daily Automation. We’ll have it run at 12:00am every day. Next we’ll go over the action you want executed once the automation in triggered.
There are 4 different types of Actions we can run:
For this example, we want to import data. Now select your Application you’ll be importing data from (in this example, I’ll select Procore). For the Configuration, select the configuration you set up earlier when connecting to Procore.
For the Destination Project, select the Toric Project we set up earlier for this endpoint: “FTB - RFI”
For the Channel, you have a few options to select from. Many clients like to select “Project (All)” when doing a Full Table Backup.
Now we can select Procore Projects to import from the Project List option. If we don’t select any, it will import every project by default. But for the purposes of demonstration, I’ll pretend that I only care about a handful of projects at the moment. Let’s select 3 Procore Projects to import.
For Source Options, this is where you’ll select your endpoint. For simplicity, it’s usually best to only import one endpoint per automation. Although, you can certainly select more. I’ll go ahead and only select “RFIs”.
I’ll also leave Split Sources as “No”. Now go ahead and select “Create Automation”. You’ll also need to enable the automation to turn it on.
Now, I’d like access to the data now. So instead of waiting until midnight for the automation to run, I’ll click “Run Once” to get my data. Now we can view the progress of the automation by clicking on History near the top.
Now in the next section, we’ll get to access the data and build our dataflow to clean and export the data.
Dataflow Creation
Now that we have imported data into our Toric Project, it’s time to create our dataflow to clean and export the data to your chosen destination.
On Toric’s left-hand menu, select “Projects” and navigate to the Project you created earlier (in this example, it’s the Project named “FTB - RFI”). Once inside the Project, click “Create a Dataflow”.
Since we’ve already begun importing our data, we can immediately start with the “Create blank flow” option on the bottom-left of the “Get Started With Toric” screen.
Once you are in the dataflow, on the left-hand menu click “Sources”. You should see the Procore projects you’ve started importing. Click-and-drag one of those sources into the dataflow. It will create a “Source” node.
Now you can view your data using the Source node.
The Source node itself allows you to customize your data upon import using these options:
- Source Name
- Version Options
- Version
- Detect Column Types
- Elements
- Include Dataset Column
- Include Empty Properties
- Flatten JSON Arrays
- Append Elements
Now it’s time to prepare the data for export. In data engineering we call this “data cleaning” or “data transformation”.
Our end goal is to export your data to your destination, such as a warehouse or data lake. If you don’t want to export every column, I like to use the “Breakout” node to select only the columns I do want to export.
One thing you might also want to do is enforce the schema for your data. I like to use the “Edit Column” node for this.
In data engineering, it’s best practice to enforce the schema for every column you’re exporting.
You should know your schema ahead of time for the columns, especially if you’re writing this to a warehouse. That warehouse will have its own schema that you need to match.
If you’re exporting your data to a data lake and are unsure of the schema your data needs to be in, ask someone on your team that handles your data infrastructure.
And if you don’t have someone else on your team, and you understand the data you’re working with, set the schema yourself.
As a note, some clients don’t enforce the schema when exporting to a data lake. You certainly don’t have to, especially if you have additional processes that occur once the data is imported into your data lake. Setting the schema is just a best practice.
Connecting the Data to the Destination Node
Now that your data is ready for export, you’ll need to follow a few more steps based on your data’s destination.
If you’re writing to a Data Warehouse, you’ll need to follow the steps below.
- Ensure your Warehouse is created or connected in Toric
- If you need to write to a warehouse inside of Toric, you will need to create one first if it doesn’t exist
- Make sure to define a PrimaryKey when creating your Warehouse
- If your warehouse is outside of Toric, you will first need to ensure Toric is connected to your software with an integration
- Then you will need to connect to your table in the “External Tables” menu
- If you need to write to a warehouse inside of Toric, you will need to create one first if it doesn’t exist
- In your dataflow, connect your data to a “Write to Warehouse” node
- In the node, map your columns in your dataset to the columns specified in Warehouse
- Turn on “Export When Automating”
- As a test, click “Write Now”
If you’re writing to a Data Lake, you’ll need to follow the steps below.
- Connect Toric to your Data Lake
- Create an Export Automation
- In your dataflow, connect your data to a “Run Export Automation” node
- Give it a filename
- You can also create a flow that takes data from the sourceMetaData and transforms it into a filename of your choice
- Select the Format for the exported file
- I like to keep “Compress” turned on
- Turn “Export When Automating” on
- Turn “Export only when valid” on
- As a test, click “Export”
Testing the Pushed Data
Now that you’ve pushed data, please login to your account and confirm that the data is there.
If you’re using a Toric Internal Warehouse, you can query the warehouse with a “Select From Warehouse” node.
If you’re using an External Warehouse, try the “Select From Warehouse” node. If it doesn’t work, you may need to give Toric “read” access from your External Warehouse’s platform.
If you’re using a Data Lake, such as with Azure or AWS, you will need to inspect your data lake using the tools those platforms give you.
Differences Between Full Tables Backup and Deltas
Full Table Backups entail the aspect of data engineering where a backup is created of the entire Table, in this case, the source data ingested into Toric via one of our connectors. This backup can be stored in one of several locations, including Internal Toric Warehouses and Data Tables, External Destinations such as Azure, or External Warehouses such as SAP BW4, BigQuery.
Put simply, an FTB (Full Table Backup) is a process where we import all data from a source (like Procore) and push it to your destination (like Azure Data Lake Storage) using Toric.
A Delta workflow is where we import all data, but only push changes between the current file and the previous file to your destination. With this approach, we export considerably less data, as the only data that truly needs to be exported to your destination is data that has changed. In order to set this up, we first orchestrate a Full Table Backup, then create the Delta workflow to only push changes moving forward from this point in time.
Full Table Backup - Dataflow Automation
If you want to set up a FTB that runs on a schedule (such as a daily or weekly full backup), you can create an automation to do this.
However, this can be very data-intensive. If you only want to backup changes in your dataset on a daily or weekly basis, see the section below on setting up a Delta Backup workflow.
If you do not care about only pushing changes and want to backup your entire table regardless of whether any rows changed or not, follow these steps.
We are going to set up a “Dataflow Automation.” This kind of automation runs whenever data is imported.
Go to the Automations menu, and click “Create an Automation”.
Give it a name and description. I will call it “FTB - RFI [Project]” with the description “FTB - RFI [Project] - Run Dataflow”. Because it will be a “Dataflow Automation”, it will be differentiated from the “data import automation” with the same name. You’ll be able to tell which one is which by their icon. But you’re free to use any naming convention you want.
For the Trigger type, set it to “Source Updated.” We want our dataflow to run whenever new data is imported. In this case, when new data is imported from Procore, our “Source” will technically be updated, and the dataflow will run.
For the Source type filter, enter “Procore”.
For the Project filter, select the project your dataflow is in. This automation will be triggered when new data is imported into your Toric project. In this example, our project is “FTB - RFI”.
For the Action type, set it to “Run Dataflow.”
For the Project, select the Project your dataflow is in. Our project is “FTB - RFI”.
Now select the dataflow you want triggered. In this example, our dataflow is named “Demonstration”.
Now you’ll want to add an “Input Override”. In the “Port” dropdown, select the source available (at this point, there should only be one item in the dropdown). In the “Entry type” dropdown, select “Reference”. Then, in the “Value” dropdown, select “Trigger payload”.
Now finish by clicking “Create automation”. You will need to “Enable” the automation for it to run (the toggle near the top-right of the screen).
Previously, we created a “data import automation” to import data daily at midnight. Now, that we’ve created this “Dataflow Automation,” it will run our dataflow (and export the data to your destination) every day after midnight.
Delta Backups
Delta Backups only push data that has changed since the last backup. The philosophy of this approach is to limit the amount of data exported to only data that has been changed, instead of backing up every row of every dataset even if there were no changes.
Before creating a Delta Backup, we highly recommend you successfully set up a FTB dataflow automation. Then, once your Delta Backup is ready, we will switch your dataflow automation to only run the Delta dataflow (instead of the FTB dataflow).
Now follow these steps to set up and activate your Delta Backup.
First, we need to make a new dataflow in the same project we’ve been working in (”FTB - RFI”). We can create our dataflow a few separate ways:
- Create a new Dataflow from scratch
- Copy your existing FTB Dataflow and edit the copy to only push Deltas
Both of the options above result in two separate dataflows: a FTB dataflow, and a Delta dataflow. If you copy the FTB dataflow,it is import to click the toggle to “Exclude” sources, not “Include.”
Now begin editing your dataflow. You should start by copying your Source node. Edit the original Source node’s “Version” from “Latest” to “Previous”. Now we should have two Source nodes: the first Source node will have the “Previous” version of the data, and the second Source node will have the “Latest” version of the data.
Now connect your “Previous” Source node to a new node called “Diff”. The Diff node takes two inputs: old and new. Connect your “Latest” Source node to the Diff’s “new” input.
The Diff node by default checks for differences between columns, in every row. Let’s go through each field in the Diff node:
Because the Diff node is used to detect data that has changed, you may find that the Diff node sometimes contains no data. This is usually due to the “old” and “new” datasets being the same. If there were no differences in the datasets, then the Diff node will output nothing.
As an important note, if you are using the Diff column (that informs you whether the row was Added, Updated, or Deleted), then you’ll need to make sure your destination (your Warehouse or Data Lake) can accept this column.
Now connect the output of the Diff node to your destination, such as a “Write to Warehouse” node for Data Warehouses or a “Run Export Automation” for Data Lakes.
Now that the Delta dataflow is ready to export your data, you’ll need to make sure to change your dataflow automation to run your Delta dataflow, not your FTB backup (if you no longer care about FTBs and only want to push changes in your data via your Delta flow).
At this point, you should already have a Dataflow Automation already set up to run the FTB dataflow whenever new data is imported into Toric (via your Data Import Automation). If you are no longer planning on sending FTBs and want to only send Diffs, you can edit the FTB Data Import Automation to point to your new dataflow, or you can disable your existing FTB Data Import Automation and create a new Data Import Automation that runs your Delta dataflow.
I recommend just disabling your FTB dataflow automation and making a new one for your Delta dataflow.
Setting up the new Dataflow Automation will be similar to the one you previously set up. All you need to do differently is ensure your Delta dataflow is selected to run under the Action section. In addition, you’ll need to add two Input Overrides instead of one.
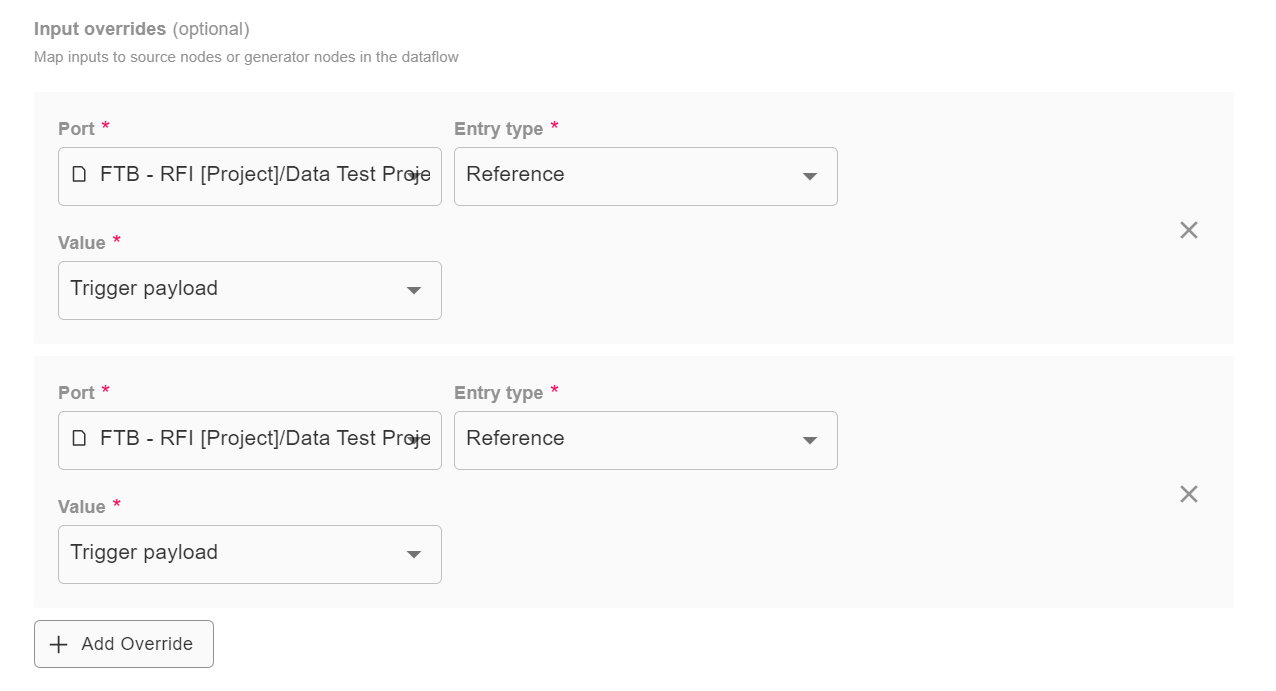
The “Ports” tell our automation where to map the data being imported into the dataflow. Because we now have two Source nodes (Previous and Latest), we need to map the first Port to the first option in the dropdown, and the second Port to the second option in the dropdown.
Just create (or update) the dataflow and your Delta dataflow should be live.
Step-By-Step Overview
Every time you want to create a FTB-to-Delta Dataflow Automation, we suggest following these steps in order:
- Create a Data Import Automation, and import 5 projects.
- Create a FTB dataflow and automation, and import all projects to push the FTB.
- Create a Delta dataflow.
- Create a Dataflow Automation that runs the Delta dataflow whenever data is imported from the Data Import Automation.


