Import your first Dataset
Discover the power of Toric as we guide you through the step-by-step process of configure connector and import data. Unlock the potential of your data with this tutorial and optimize your construction project management like never before.
Key Topics Covered
- Learn how to configure a connector
- Import data using “Get Data” button
- Import data using Automation
- Use sample dataset
Getting started with Toric
In this step-by-step training guide, we will walk you through the process of setting up your Toric Pro account, configuring your initial connector, and importing your first dataset. Whether you are an architect, engineer, project manager, or any other professional in the AECO field, Toric empowers you to integrate and automate configurable dashboards tailored to your specific needs.
With Toric, you can easily connect and combine data from different sources like Procore, Autodesk Construction Cloud, Revit, Navisworks, Google Drive, Box, Dropbox, and more. Our platform allows you to create detailed dashboards that offer real-time insights, improve collaboration, and optimize decision-making throughout your organization.
Creating your Toric account
- If you have spoken with a Toric representative: Once you or someone on your team has spoken with a Toric representative, they will receive an email from Toric with instructions to create your Toric account. Sign up with your email address and create a password, and you will be routed to your new Toric home screen!
- If you sign up yourself: On the Toric website, you can sign up for a ‘Free’ Toric account here. Once you’ve created your Free account and logged in for the first time, you can immediately upgrade your account to Pro by navigating to ‘Settings’ on the left hand side of your Toric screen, clicking on ‘Billing’ on the top tab of your settings, and then choosing to upgrade your account to ‘Pro’:
Configuring your settings
Once you receive access to your Toric account, the first thing you’ll want to do is to configure your settings. Your settings allow you to perform actions such as enabling Two-Factor Authentication and Single Sign-On, viewing your Billing Options, enabling update notifications, and setting up your members.
- Organization:
- Organization: The Organization tab allows you to change your Organization Name, your Organization Discoverability, change your organization logo, enable Two-Factor Authentication and Single Sign On, as well as view and edit Members within your account.
- Account Details: The Account Details tab allows you to change user avatars, edit your name, and also to view which organizations you belong to.
- Billing: The Billing Tab allows you to view which sort of Toric Plan you are enrolled in, whether Free, Pro, or Enterprise. It will inform you if your plan is active or inactive, and also allows you to downgrade or cancel your Toric subscription.
- Privacy: The Privacy Tab allows you to view Toric’s full Privacy Policy, along with the Toric Terms of Service.
- Notifications: The Notifications Tab allows users to enable or disable notifications that will alert you when automations complete or fail.
Configuring your first Connector
Once you have your settings structured in a format that works for you and your team, it's time to set up your first connector. Each connector works a bit differently, we listed a few commonly used connector below. You can find the full list of connector tutorial under Connector Page.
Set up Procore Connector
To successfully configure your Procore Connector, you will need to have an active Procore account and the necessary permissions to manage access to your data.
There are three steps to set up a Procore Connector:
- Install the Toric Application from the Procore marketplace.
- Set permissions for your Procore account to access your data.
- Configure the Procore DMSA Connector in Toric.
Please see the Full Process video for connecting Toric to your Procore.
Please be aware that the Toric product is subject to frequent updates and changes. It is possible that you may notice slight differences in the Toric interface compared to what you are currently using. For instance, the Connector Page was previously referred to as Integrations.
If you are interested in learning more, you can find the detailed Step-by-Step tutorial for Procore here
Set up Autodesk Construction Cloud (ACC) Connector
To successfully configure your ACC Connector, you will need to have an active ACC account and the necessary permissions to manage access to your data.
There are three steps to set up an ACC Connector:
- Install Toric from the Autodesk App Store
- Install Toric from ACC Account Administration
- Configure the ACC Connector in Toric.
Please find the detailed Step-by-Step tutorial for ACC here.
Please be aware that the Toric product is subject to frequent updates and changes. It is possible that you may notice slight differences in the Toric interface compared to what you are currently using. For instance, the Connector Page was previously referred to as Integrations.
Set up Google Drive Connector
To successfully configure your Google Drive Connector, you will need to have an active Google Drive account and the necessary permissions to manage access to your data.
Setting up a Google Drive connector is quite simple. All you have to do is configure the Google Drive Connector in Toric.
Please find the detailed Step-by-Step tutorial for Google Drive here.
Please be aware that the Toric product is subject to frequent updates and changes. It is possible that you may notice slight differences in the Toric interface compared to what you are currently using. For instance, the Connector Page was previously referred to as Integrations.
Set up Box Connector
To successfully configure your Box Connector, you will need to have an active Box account and the necessary permissions to manage access to your data.
Setting up a Box connector is quite simple. All you have to do is configure the Box Connector in Toric.
Please find the detailed Step-by-Step tutorial for Box here.
Please be aware that the Toric product is subject to frequent updates and changes. It is possible that you may notice slight differences in the Toric interface compared to what you are currently using. For instance, the Connector Page was previously referred to as Integrations.
Set up Salesforce Connector
To successfully configure your Salesforce Connector, you will need to have an active Salesforce account and the necessary permissions to manage access to your data.
Setting up a Salesforce connector is quite simple. All you have to do is configure the Salesforce Connector in Toric.
Please see video below for setting up Salesforce Connector.
Please be aware that the Toric product is subject to frequent updates and changes. It is possible that you may notice slight differences in the Toric interface compared to what you are currently using. For instance, the Connector Page was previously referred to as Integrations.
Please find the detailed Step-by-Step tutorial for Salesforce here.
Importing data using “Get Data” Button
"Get Data" is a convenient method to import data for one-time use when you are working on a Toric Project and/or a Toric Dataflow.
“Get Data” button can be found in 2 places
- In any Toric Project, go to Source Tab

- In any Toric Dataflow, go to Source panel
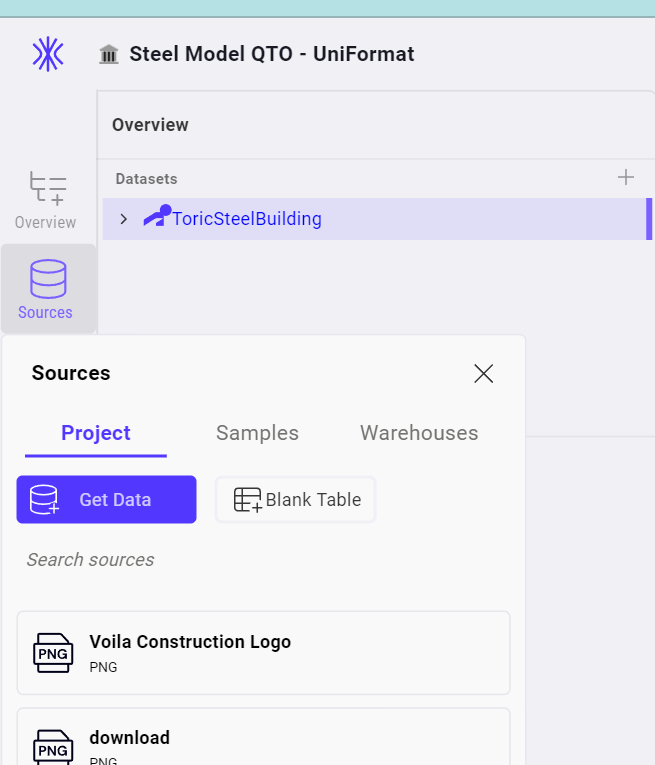
Clicking on “Get Data” button will give you a full list of all the connectors Toric supports. You can select the connector you want to import data from and complete the import data setting.
See the example below for Importing Procore Data using “Get Data” button.
Importing data using Automation
Once you have set up your connector, it is time to establish an automation schedule.
- Navigate to the ‘Automations’ tab.
- On the next screen, you will see any previously created automations. This includes information such as the automation's name, record size, creator name, trigger type, last run timestamp, and the status of the last run. Additionally, you can use this page to enable or disable automations. You also have the option to manually run any automation if desired.
- To set up the automation, you will click on 'Create an Automation'.

- On the 'Create Automations' page, you will be required to provide a Name and Description for your automation. Additionally, you will configure the Trigger and Action settings. Below is an example of the default "Create Automation" page.

Trigger Types:
- The 'Source Updated' option will trigger your automation whenever a new version of your data is updated within the Application you selected for Source Type.
- The 'Time-Based' option gives you the flexibility to schedule your automation at specific intervals. For example, you can set it to run every day at 5 pm, every week on Monday morning, or even every 5 minutes if you prefer.
- With the 'Manual' option, you have the freedom to run the automation whenever you choose by simply clicking the 'Run Now' option.
- By selecting the 'Webhook' option, your automations will be updated within a second of any changes made to the source data.
The automation setup for the Trigger section will vary depending on the trigger type you choose.
Action Types:
- Run Dataflow: This option allows you to execute a Dataflow of your choice.
- Import Data: Use this option to bring in data and update or create source(s).
- Configure Webhook: Use this option to register a webhook with an external application.
- Export Data: Use this option to export data to an external application, usually a data warehouse or data lake.
The automation setup for the Action section will vary depending on the action type you choose.
See the example below for setting an automation to Import Procore Data on a weekly basis.
If you are interested in learning more about Automation, you can find a detailed tutorial here.
Using Toric Sample data
If you are interested in exploring Toric but do not have a dataset available, you can always make use of Toric Sample data.
Step-by-Step Instruction
- Open the Source Panel in your dataflow from the left side
- Select the Sample section
- Drag and drop the sample data file


