BIM Analytics 101 - Leveraging BIM for Insights and Analytics
Training Description
BIM Analytics 101 is a starter guide designed for BIM beginners or those that want to get around 3D geometry and access BIM models data. If you are looking to expand your BIM skillset, this training will give you some high level concepts to build a data flow that can get you to get more impactful insights for your organization.
By the end of this training you will have a high level understanding of:
- How to import BIM data from different apps such as Revit an Navisworks
- How to compare, transform, visualize and interact with the BIM data from Toric to make data driven decisions
- Be familiar with Revit and Navisworks plug ins as well as how to install other available plug ins
- How to combine and use Toric nodes for BIM data transformation
- Different useful cases to get more of BIM models data
Duration
45 minutes
Target Audience
- Data analysts, engineers, and business intelligence professionals using Toric for BIM Data Analysis
- AEC professionals involved in BIM management
- Anyone interested in learning Toric for BIM Data Analysis
Introduction to BIM Data in Toric (4 min read)
Building Information Modeling (BIM) is a process that involves the management of different layers of information that live inside of a project besides 3D geometry data. In a way BIM can help architects, engineers and designers to get a data driven perspective of the projects. With Toric, BIM Models are not just a 3D visualization tool or something that you can use for clash detection. Toric can also become a useful tool for project management decision making.
For this training we are going to use the term BIM data for all the information that a BIM model can contain and that can be extracted using Toric's integrations. This includes but is not limited to 3D geometry, Revit schedules and parameters.
Toric’s integrations can be used in two ways: thru the use of plug-ins for native desktop apps such as Revit, Navisworks or Civil 3D. And also by setting up Automations to other platforms.
Toric's BIM data extraction capabilities allow users to access different types of information inside the same model, including geometric and non-geometric data, as well as metadata. Toric can be used to compare and/or combine model data from different models and versions of this models. This information can be used for a wide range of applications, such as model comparison, facility management, or even energy analysis.
You can display project metrics using Toric’s Visualizations that allow you to share the project insights. For more information regarding Visualizations please visit the Visualization 101 Training section of this page.
Importing BIM Data using Plug-ins (20 min read)
In this training session you will learn:
- How to install the Revit, Navisworks, Archicad, and Civil 3D plugins
- How to export BIM data from the Revit models.
- Get your way around the Toric Plug in UI
- Types of data that you can export from the Revit models.
Installing the Revit Plug-in
Revit Plug-in UI
The video below demonstrates the process of using the Toric Revit Plugin, from explaining Toric Revit Plugin Interface to reviewing Revit Data on Toric.
View-based Revit Plugin Layout

Select the items to send to the Toric app:
- Select all: This option selects all items within the currently open tab.
- Revit Elements: If you don't have a specific 3D view to import, you can choose the view-independent group to import all Revit data. More importantly, this group includes elements that are not associated with a specific view, such as Project Information and Warnings. The available options for 3D views are based on your Revit Model. By selecting a specific 3D view, Toric will only import the elements from that view. It's time and data usage efficient to select a particular 3D view for importing when your model elements have already been organized by 3D views. For example, if you have a 3D view for each floor or zone.
- Schedules: This option displays all Schedules contained within the open project, including Revision Schedules and Sheet Lists.
Select Toric’s project and source
- Organization: Select the Organization where you want to save your file. This is typically your company.
- Project: Choose the Toric Project folder where you want to save your file.
- Dataset Source: By default, the Toric plugin will use the model name as the dataset source name. However, you can manually enter a different name in the provided box.
- Send Options: This option allows you to determine the level of 3D geometry you want to include.
- Send to Toric: When you are ready to import your Revit model, click on Send to Toric to initiate the import process.
After the exporting process is finished, you can click on Open Project in Toric to review your data in Toric.
Here is a helpful guideline for selecting:
- If you do not have a specific 3D view to import, please check the View-independent group for import.
- If you have specific 3D view(s) to import, please locate the view(s) and check the respective box(es) for import.
- If you require any elements that are not associated with 3D views, such as warnings, project base point, survey point, project info, and worksets, please find the desired elements under the View-independent Group and check the corresponding box(es).
If you are using an older version of the Revit Plugin, please follow the instructions below.

After the exporting process is finished, you can click on Open Project in Toric to review your data in Toric. When you install the Toric plugin, it will be installed in all Revit versions available on your computer.
🏗️ Pro tip: If you’re in the Revit Elements tab, checking Select All will select all Revit elements for you and will not have any impact on the Schedule tab.
To export schedules from Revit you just need to click on the Schedules tab. Click on Select all or manually select the schedules that you want to export to Toric.

2.2 Installing the Navisworks Plug-in
Navisworks Plug-in UI

After the exporting process is finished, you can click on Open Project in Toric to review your data in Toric.
💡 Key concepts:
Each time that you export the model it goes to a Project Source, you can update and create different versions of the same Project Source. Giving you the ability to work with a specific version of the model as the project moves forward.
🏗️ Pro tip: Toric is a Extract, Transform and Load (ETL) oriented Tool. This means that all data transformations like filtering data are going to be made in the Toric App. So let’s say that you need to work on a unit mix, it is highly encouraged to remove any unplaced and redundant rooms in the revit model first. Otherwise you may need to add extra steps to your data flow.
Besides Navisworks and Revit plugins you can follow the same process for Civil 3D and Archicad plugins. Just follow the instructions below:
- Go to app.toric.com and sign in with your registered credentials
- Click on Integrations on the left sidebar
- In the Integrations page you will find all integrations an plug ins available. Scroll down until you find the Construction & BIM section
- Locate the Graphisoft Archicad and the Autodesk Civil 3D plugins card and click on Download plugin to download the installer
- Follow the installer instructions. You will need to have the app closed for this step

Importing BIM Data directly from Toric (1 min Read)
Besides using Toric’s plug ins there is a way to import data without getting out of Toric app. Toric Plug ins are the way to go when doing a local ingest of data, you will need to import and use the plug in to update the dataset once the project has come to a new stage that you would like to explore and analyze. If you are looking for a more dynamic and automatic way to import the data you can opt for using Automations. You can use the Get Data button under the Datasets section of the Overview.

The Get Data button gives you access to Toric’s Connectors. From here you can get BIM data from apps like Autodesk Construction Cloud. For more information regarding on how to set up Connectors and the proper Automations visit the Connectors section of this page.
Inspecting BIM Data in Toric (4 min read)
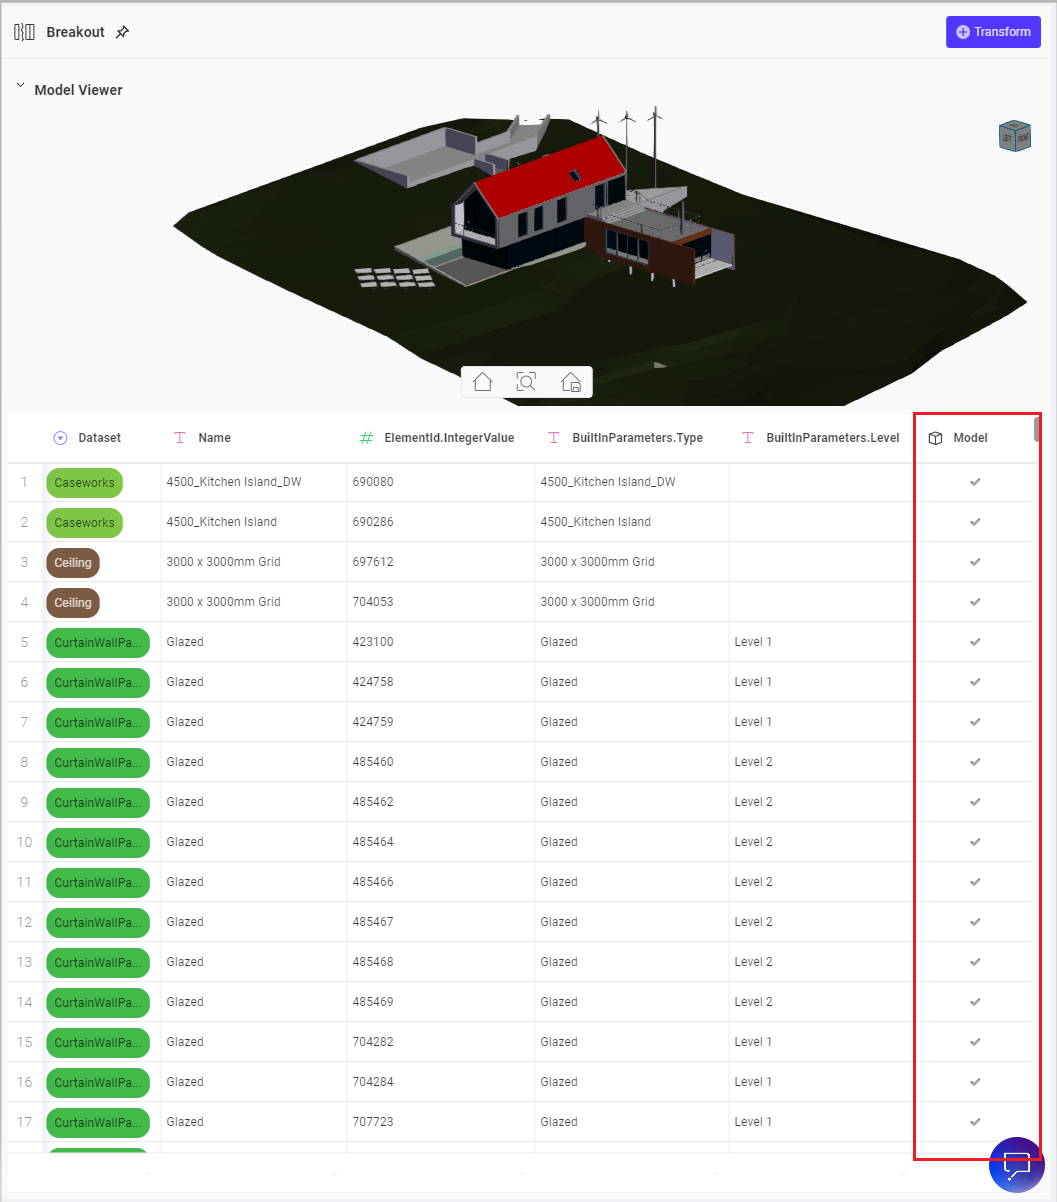
In this section you will learn more about the key concepts when it comes to 3D Geometry data in Toric. When working with BIM data in Toric you can visualize the modeled elements in the Model Viewer that appears above the data that you are working with.
Toric has created a field called "Model" to indicate whether an element has 3D geometry or not (see screenshot above). The "Model" field is a boolean value. When checked, it indicates that the corresponding element has 3D geometry.
Make sure to always include the Model field in the dataset that you are using to see the 3D geometry.

To get the 3D Geometry information ready for visualization you will need to configure the Send Options in the plug in that you have used to import the data.
- Check the Export 3D geometry option on the Send Options menu
- Select the level of detail that you want to export. This level will match the Revit Detail Level.

🏗️ Pro tip: You can inspect the data provided using the ElementId field in the dataset from the original model that you used to import the data to verify in the model that the data is reliant. This is useful when you have imported elements that were originally hidden in Revit, for example, and now need to be filtered out for a specific data flow.

🏗️ Pro tip: 3D geometry will not be available after the Summarize node.
🏗️ Pro tip: The combination of other nodes like Append may come in handy to consolidate all your BIM data into one table.
How the Model Viewer Works
In this section you will learn how to interact and navigate the Model Viewer.

Pro Tip!: To navigate the model, you can use the following commands:
- Pan: CTRL+Left Click (CMD + Left Click on Mac)
- Orbit: Left Click
- Zoom: Scroll wheel
Once you have a good view of the model, click on the Set Home button. Saving your camera position by clicking this button will allow you to return to that scene by clicking the Home button.
Try the Zoom to fit button to display all modeled elements selected in the current node.
The Toric viewer and its capabilities
Toric has the ability to display the 3D data that you can import with the Model Viewer, a visual aid in each table that you are interacting with. This allows you to visualize and manipulate the elements that you export from the BIM tools that have been covered in this training. To access to the Model Viewer you need to click on the Open/Close Model section button represented by a cube icon on the top left corner of the dashboard. Remember that the Model Field is needed to visualize the 3D geometry.

When a dataset does not contain 3D Geometry or the Model Field is not appended in the table, the Model Viewer will show a No Data message.

Processing BIM data (11 min read)
In this section you will learn some of the most common nodes in Toric for BIM data analysis. Beside having 3D geometry, BIM datasets work the same way as you would transform other datasets so there is no need any BIM experience to use this nodes.
In the sections below you will find a list of Nodes with a preview of how to use them combined with other nodes. You will see how easy it is to join multiple sets to other BIM datasets.
Calculate Nodes
- Arithmetic: calculate numerical columns
- Summarize: helps in creating simple calculations for one column
🏗️ Pro-tip: Another node that comes really usefull to add to your toolbox is theField Calculator: calculates column based on other single values
Transform Nodes
- Filter: filters inputs based on values in a column
- Breakout: extracts a column or sets of columns
- Group by: often pairs with Summarize, Field Calculator
- Coalesce: merge columns by picking the first non-null value. Often uses to merge data scattered in different columns into one column
- Concatenate: combines 2 or more columns or entire tables
- Append: affix rows together. Might pair with Coalesce when needed.
- Join: combine columns and tables by joining them.
- Edit Column: edit the type and name of columns
- Diff: find differences between two datasets. Often use to compare data from different model versions
🏗️ Pro-tip: Another node that comes really usefull to add to your toolbox is the Model Spatial Scanning: Query model geometry using spatial scan
Visualize Nodes
- Dropdown: often pairs with Unique and Filter nodes
The way in which these nodes are used depend on the data transformation you are trying to achieve. In the example below, you can see three types of elements being filtered just based on the dataset field and combined into a single table using the Append node. You could add an extra layer of data granularity by filtering based on the Construction phase, for example.

Study cases and Use-cases
Some great Use-cases for your BIM data in Toric.
Model Comparison Data App
Learn more about some great case studies from our customers who have explored and gotten more from their BIM data in Toric.


