Configure Procore DMSA Connector

Getting your data is easy with Toric’s integrations. Read on for a step-by-step guide to configuring a Procore DMSA Connector to access your company and project data in Toric.
This article covers:
- • What is a Developer Managed Service Account?
- • Install Toric from Procore Marketplace
- • Configure Procore DMSA in Toric
- • Example Procore Connector Automation
- • FAQ
What is a Developer Managed Service Account?
Procore Developer Managed Service Account, or DMSA is method which allows Procore Administrators to install third party apps in order to access Procore data. For more on this topic please read the following support article.
Install the Toric Application from Procore Marketplace
A user with Procore administrator privileges will need to install the Toric application from the Procore marketplace. During installation you can select the specific projects Toric can access. This can be modified post installation.
Configure Procore DMSA in Toric
Login to Toric and follow these steps to setup a Procore Connector:
- Enter a Configuration Name
- Select a Procore API Endpoint
- Login to with Procore Admin credentials
- Select a Company ID
- Validate Your Configuration
Setup time: 42 seconds
1. Enter a Configuration Name
Navigate to Integrations page and click on Setup Integration.
Create a New Procore Configuration and click on the Developer Managed Service Account tab. Type a unique name for your Procore DMSA Connector.
2. Select a Procore API Endpoint
There are three options to choose from
- sandbox.procore.com
- api-monthly.procore.com
- api.procore.com
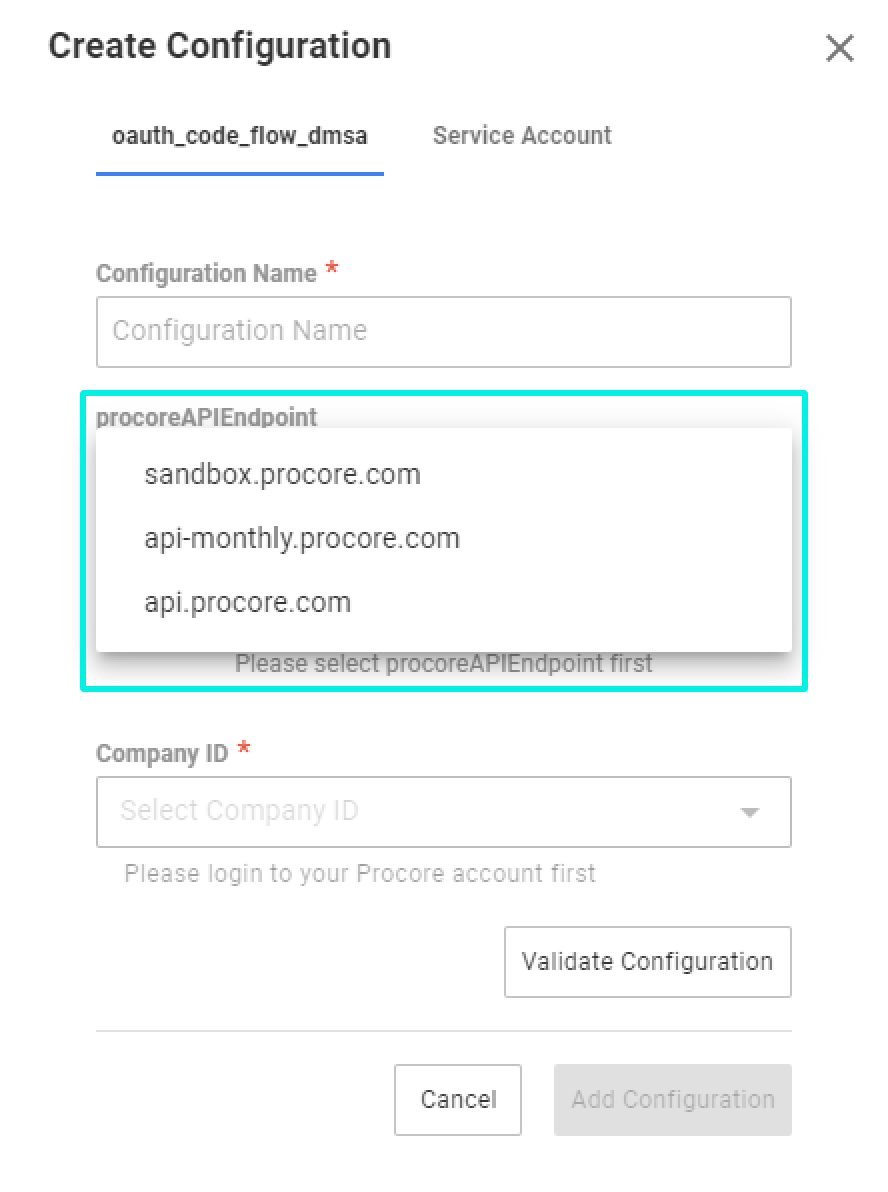
To test your new connector, you could use the sandbox url. When you're ready to pull your actual company data, you will need to update the configuration and select api.procore.com.
3. Log in with Procore Credentials
This step is used to link the specific Procore company where the Toric application is installed. Make sure you're using the username and password of a Procore User. If you do not have such an account, please reach out to your team and have someone with the proper Procore account set up the Procore Configuration.
4. Select a Company ID
Use the dropdown to select a Company ID.
Note: If your administrator account has access to multiple companies you will see each of them in this list.
5. Validate your Configuration
Use the Validate Configuration button to make sure all fields are completed correctly. Invalid fields will be highlighted in red, and a successful validation will show in green.
Click on Add Configuration to finalize the creation of your Procore Connector.
Example Procore Connector Automation
Checkout this quick example of a Procore automation. Learn more about other types of Automation actions in the article, Automations for Integrations. To setup Webhooks, check out how to Configure Procore Webhook.
Here's what Procore data looks like in Toric.
Related articles
Next steps
Other Topics


